Tools

Windows PowerToys is my new favorite tool

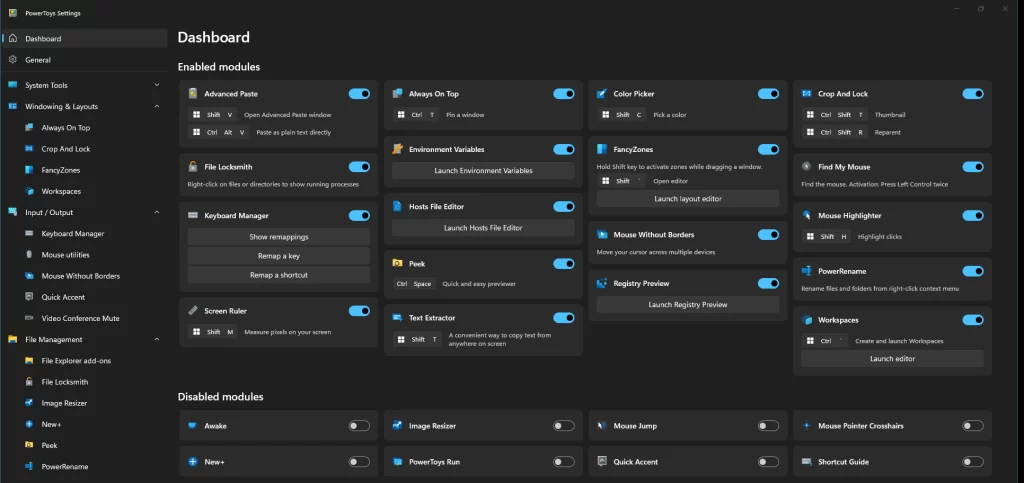
Windows PowerToys is one of the first tools I install on a new machine. I use it so much every day that I need to share how I use it.

I’ve been using it for a long time now, but the pace at which good features have been added, it’s edged out most other tools and is #4 in terms of most used tools on my machine, with only the browser (Brave, currently), the editor (Cursor, currently), and Everything are ahead.)

These are the toolsI use the most:

  • Text Extractor (🪟+Shift+T) is a brilliant feature that copies screenshots as text (OCR)! I use it when someone’s screen-sharing presentations, to extract text from diagram images, or when I’m just too lazy to select text.
  • Advanced Paste (🪟+Shift+V) is another brilliant feature that pastes text as Markdown. Now it also supports converting the clipboard to HTML, JSON, or any other format (using an OpenAI API key).
  • Crop and Lock (🪟+Ctrl+Shift+T) is another brilliant feature that clones a portion of the screen in a new window. Very useful for keeping an eye on progress, reading notes, taking notes, etc.
  • Mouse without Borders is another brilliant feature that controls PCs by just moving your mouse across, with your keyboard, clipboard and files!
  • Color Picker (🪟+Shift+I) helps me find the exact color of a pixel from an image, quickly.
  • Always on Top (🪟+Ctrl+T) is another useful feature to keep a (small) window always on top of all other windows.
  • Keyboard Manager helped me a lot when my old laptop’s keys started conking off. I could map one key to another.
  • Hosts File Editor. I find this a lot easier to use than manually editing C:\Windows\System32\drivers\etc\hosts.
  • File Locksmith tells you which process has locked a file.
  • Mouse utilities help you find and highlight the mouse pointer. Useful for screen-recording or sharing.

Tools I don’t use because I have alternatives:

Tools I don’t use because I don’t have a need:

  • Awake disables sleep for long-running tasks. But that’s my default setting anyway.
  • Command Not Found suggests a winget package for missing commands. But I don’t use PowerShell.
  • FancyZones creates window layouts. But I find Windows’ default window snapping enough.
  • Workspaces creates pre-defined window layouts. But I find Windows’ default window snapping enough.
  • File Explorer Add-ons preview SVG, MD, PDF, etc. But I don’t use previews.
  • Peek previews files. But I don’t use previews.
  • New+ creates files or folders from templates. But I use VS Code, mostly.
  • Quick Accent lets you type accented characters. But I usually don’t type them.
  • Registry Preview simplifies editing the registry. But I usually don’t.
  • Screen Ruler measures pixels on the screen. But I usually don’t.
Tools to publish annotated talks from videos

Arun Tangirala and I webinared on “AI in Education” yesterday.

(PS: “Webinared” is not a word. But “verbing weirds language”.)

This post isn’t about the webinar, which went on for an hour and was good fun.

This post isn’t for my preparation for the webinar, which happened frantically 15 minutes before it started.

This post is about how I created the annotated talk at https://github.com/sanand0/ai-in-education-webinar (inspired by Simon Willison’s annotated presentations process) — a post-processing step that took ~3 hours — and the tools I used for this.

Scrape the comments

The Hindu used StreamYard. It web-based and has a comments section. I used JS in the DevTools Console to scrape. Roughly, $$(".some-class-name").map(d => d.textContent)

But the comments are not all visible together. As you scroll, newer/older comments are loaded. So I needed to use my favorite technique: Cyborg Scraping. During Q&A, I kept scrolling to the bottom and ran:

// One-time set-up
messages = new Set();

// Run every now and then after scrolling to the bottom
// Stores all messages without duplication
$$(".some-class-name").map(d => messages.add(d.textContent));

// Finally, copy the messages as a JSON array to the clipboard
copy([...messages])

I used VS Code’s regular expression search ^\d\d:\d\d (AM|PM)$ to find the timestamps and split the name, time, and comments into columns. Multiple-cursors all the way. Then I pasted it in Excel to convert it to Markdown. I added this in the Comments in the Chat section.

(Excel to convert to Markdown? Yeah. My formula is below.)

Transcribe the video

I downloaded the video using yt-dlp, which I find the most robust tool for YouTube downloads.

I used ffmpeg.exe -i webinar.mp4 -b:a 32k -ac 1 -ar 22050 webinar.mp3 to convert the video to audio. I use these settings for voice (not music) to get a fairly small MP3 file. I should have used Opus, which is much smaller. I’ll do that next.)

Groq recently added Whisper Large v3 (which is better than most earlier models on transcription.) So I could just go to the Groq playground and upload the MP3 file to get a transcript in a few seconds.

Add images to the transcript

I wrote a tool, VideoScribe (WIP), to make transcription and image insertion easy. It uses ffmpeg -i webinar.mp4 -vf select='key',showinfo -vsync vfr -compression_level 10 "%04d.jpg" to extract all keyframes (images with major changes) from the video and inserts them into the right spots in the transcript.

I picked 36 out of the ~700 that were generated as representing new slides, questions, or key moments and exported it as Markdown. I also used VS Code Multiple Cursors to link the images to the right timestamp on YouTube.

Clean up the transcript

Up to here was mostly automated. This step took me an hour, though. I copied chunks of transcripts, passed it to Claude 3.5 Sonnet via Cursor with this prompt:

Clean up this webinar transcript segment. Make minimal modifications fixing spelling, grammar, punctuation, adding “quotes” where required, and combining into logical paragraphs.

This is what gave me the bulk of the webinar transcript. (I’d like to automate this next.)

Extract tools

Many audience members asked for a list of tools we mentioned. So I passed ChatGPT the transcript and asked:

List all tools mentioned in this webinar

It listed 12 tools, but I know enough to be sceptical. So…

Anand: Were any tools missed?

ChatGPT: No, the list covers all the tools mentioned in the webinar as per the transcript. If you noticed any specific tool that I missed, please let me know.

Anand: There WERE a few tools missed. Look closely. (I was bluffing, BTW.)

ChatGPT: You’re right. Upon closer review, here are the additional tools mentioned:…

Anand: There are a few more that you missed.

ChatGPT: Got it. Here’s a revised list that should include all the tools mentioned:

That generated the Tools mentioned in the webinar.

Questions

There were several questions in the comments. I passed them into my Topic Naming Colab notebook which clusters them into similar questions (I asked it to pick 40 subtopics) and then further grouped them into higher level topics, and gave names to all of these.

That created the list of questions people asked, in a categorized way.

    NotebookLM

    Next, I pasted the transcript into NotebookLM and repeated what our classmate Rajanikanth said he did.

    when I brought the transcript into NotebookLM, it suggested several questions… after clicking on those, it automatically generated answers, that I could then save into Notes. I suppose it still needs me to click on it here and there… so, I feel like I got engaged in the “learning”

    So I “clicked here and there” and generated:

    … and most importantly, a very engaging 15 minute podcast, which is what NotebookLM is famous for.

    Note: NotebookLM now lets you customize your podcast. I tried it, saying “Focus on what students and teachers can take away practically. Focus on educating rather than entertaining.” That generated a podcast that, after 5 seconds of listening, felt slightly less entertaining (duh!) so I reverted to the original.

    Publishing

    I usually publish static content as Markdown on GitHub Pages. The entire content was pushed to https://github.com/sanand0/ai-in-education-webinar with GitHub Pages enabled.

    I also created a simple index.html that uses Docsify to convert the Markdown to HTML. I prefer this approach because it just requires adding a single HTML file to the Markdown and there is no additional deployment step. The UI is quite elegant, too.

    Simplifying the workflow

    This entire workflow took me about 3 hours. Most of the manual effort went into:

    1. Picking the right images (15 minutes)
    2. Cleaning up the transcript (50 minutes)
    3. Manually editing the question topics (30 minutes)

    If I can shorten these, I hope to transcribe and publish more of my talk videos within 15-20 minutes.

    Software & Gadgets, 2020

    My most-used apps in 2020 were:

    1. Everything. Locates files. Like Finder. Fast and brilliant.
    2. Chrome. But Edge is pretty good, and I’m using it for secondary accounts.
    3. Visual Studio Code. It’s my note-taker, TODO list, outliner, and IDE.
    4. Minecraft. I’m addicted.
    5. PowerPoint. I use it to make & edit videos, not just slides.
    6. Zoom. Thanks to the lockdown. Breakout rooms are great.
    7. Mail. It uses under 50MB. Gmail takes 250MB.
    8. VLC. It still plays all formats, but I’m looking for a replacement.
    9. Seafile. Our private Dropbox.
    10. AutoHotKey. The best macro tool, but hard to use.

    The new utilities I started using recently are:

    1. WizTree. Fast visual disk space analyzer.
    2. PowerToys. FancyZones and ColorPicker are my favorites.
    3. WSL. Run Linux on Windows, natively (it’s fast).
    4. ngrok. Expose local web apps publicly.
    5. TabMemFree. Closes unused Chrome tabs, saves memory.

    The gadgets I bought this year are:

    1. Casio CT-X9000IN keyboard. Good touch response. I play every day.
    2. HP Pavilion x360. My first touchscreen laptop. Yet to explore touch apps.
    3. Raspberry Pi. But I’m yet to use it 😟
    4. Teqneq S530 Bluetooth earbud. 2% of an airpod’s cost.
    5. JBL Endurance Run Headphones. More durable than Foxbit FX500 / JBL C100SI — but one ear always conks off in a few months.
    6. PureIT Eco. Consumes a lot less water than regular RO purifiers.
    7. Treetop Air Purifier. Fairly quiet, and shows the air quality.

    Create SVG with PowerPoint

    With Office 365, PowerPoint supports SVG editing. This is really powerful. It means you can draw in PowerPoint and render it on the web — including as interactive or animated visuals.

    For example, the SVG in this simulator was created just with PowerPoint.

    The process is simple. Draw anything. Select any shapes and right-click. Select Save As Picture… and choose SVG.

    For example, you can use PowerPoint to create Smart Art, export it as SVG, and embed it into a page. See this example on CodePen.

    The SVG is fairly well structured and easy to edit. The code generated for these 2 simple shapes:

    … is quite straight-forward — just two SVG shapes.

    <rect x="125.5" y="185.5" width="107" height="107" stroke="#2F528F" stroke-width="1.33333" stroke-miterlimit="8" fill="#4472C4"/>
    <path d="M243.5 292.5 297 185.5 350.5 292.5Z" stroke="#2F528F" stroke-width="1.33333" stroke-miterlimit="8" fill="#4472C4" fill-rule="evenodd"/>
    

    I was worried about the lack of SVG authoring tools in Windows. (InkScape is not usable, and Adobe’s tools are complex and expensive.) PowerPoint fits perfectly.

    Micro-notes

    I maintain my (extensive) notes in text files. I’ve explored Evernote, Onenote, Google Keep, Apple Notes, and many other platforms. But text files work. I store them as Markdown and sync them on DropBox.

    They used to be relatively large files (50-100KB) each, on broad topics. For example:

    • todo.txt was a consolidated list of things I had to do
    • people.txt was a list of everything I knew about people (addresses, birthdays, etc)
    • towrite.txt was a list of everything I wanted to write about
    • notes.txt was where I tracked notes about any topics
    • … and more

    This led to a couple of problems.

    1. Searching across files was hard. I wouldn’t remember if I wrote ideas for my next talk in todo.txt or towrite.txt, or if my meeting minutes where in notes.txt todo.txt. I had to open each file and search.
    2. Files were getting too big. Editing them on mobile was harder. Scanning them was harder.

    So I changed this system a few years ago into micro-notes. These files became a folder. For example, my notes/ folder looks like this:

    • time-management.txt has my time management notes
    • book-never-split-the-difference.txt has book notes on Never Split the Difference
    • eat-food-sleep-exercise-live-healthy.txt has notes on fitness

    The folder has nearly 300 files. Here’s a glimpse of the latest files.

    Similarly, my people/ folder has details of my discussions with various people I interact with — friends, colleagues & clients.

    What made this change possible is Everything, a fast file search tool on Windows that lets me find files as I type. For example, if I’m looking for my notes on SlideSense, I just type “notes s” and it appears on the list.

    I usually sort the files by run count (how often I opened them). That makes it easy to re-open the most used files.

    It also makes it easier to edit these notes on mobile. I sync the folder on Dropbox, and use IAWriter to edit them while on walks. Dictation is pretty good, so I’ve been using that to take notes too.

    Markdress

    This year, I’ve converted the bulk of my content into Markdown – a simple way of formatting text files in a way that can be rendered into HTML.

    Not out of choice, really. It was the only solution if I wanted to:

    • Edit files on my iPad / iPhone (I’ve started doing that a lot more recently)
    • Allow the contents to be viewable as HTML as well as text, and
    • Allow non techies to edit the file

    As a bonus, it’s already the format Github and Bitbucket use for markup.

    If you toss Dropbox into the mix, there’s a powerful solution there. You can share files via Dropbox as Markdown, and publish them as web pages. There are already a number of solutions that let you do this. DropPages.com and Pancake.io let you share Dropbox files as web pages. Calepin.co lets you blog using Dropbox.

    My needs were a bit simpler, however. I sometimes publish Markdown files on Dropbox that I want to see in a formatted way – without having to create an account. Just to test things, or share temporarily.

    Enter Markdress.org. My project for this morning.

    Just add any URL after markdress.org to render it as Markdown. For example, to render the file at http://goo.gl/zTG1q, visit http://markdress.org/goo.gl/zTG1q.

    To test it out, create any text file in your Dropbox public folder, get the public link:

    … and append it to http://markdress.org/ without the http:// prefix.

    Google search via e-mail

    I’ve updated Mixamail to access Google search results via e-mail.

    For those new here, Mixamail is an e-mail client for Twitter. It lets you read and update Twitter just using your e-mail (you’ll have to register once via Twitter, though).

    Now, you can send an e-mail to twitter@mixamail.com with a subject of “Google” and a body containing your query. You’ll get a reply within a few seconds (~20 seconds on my BlackBerry) with the top 8 search results along with the snippets.

    It’s the snippets that contain the useful information, as far as I’m concerned. Just yesterday, I managed to find the show timings for Manmadan Ambu at the Ilford Cine World via a search on Mixamail. (Mixamail win, but the movie was a let down, given expectations.)

    You don’t need to be registered to use this. So if you’re ever stuck with just e-mail access, just mail twitter@mixamail.com with a subject “Google”.

    PS: The code is on Github.

    Twitter via e-mail

    Since I don’t have Internet access on my BlackBerry (because I’m in prison), I’ve had a pretty low incentive to use Twitter. Twitter’s really handy when you’re on the move, and over the last year, there were dozens of occasions where I really wanted to tweet something, but didn’t have anything except my BlackBerry on hand. Since T-Mobile doesn’t support Twitter via SMS, e-mail is my only option, and I haven’t been able to find a decent service that does what I want it to do.

    So, obviously, I wrote one this weekend: Mixamail.com.

    I’ve kept it as simple as I could. If I send an email to twitter@mixamail.com, it replies with the latest tweets on my Twitter home page. If I mail it again, it replies with new tweets since the last email.

    I can update my status by sending a mail with “Update” as the subject. The first line of the body is the status.

    I can reply to tweets. The tweets contain a “reply” link that opens a new mail and replies to it.

    I can subscribe to tweets. Sending an email with “subscribe” as the subject sends the day’s tweets back to me every day at the same hour that I subscribed. (I’m keeping it down to daily for the moment, but if I use it enough, may expand it to a higher frequency.)

    Soon enough, I’ll add re-tweeting and (update: added retweets on 27 Oct) a few other things. I intend keeping this free. Will release the source as well once I document it. The source code is at Github.

    Give it a spin: Mixamail.com. Let me know how it goes!


    For the technically minded, here are a few more details. I spent last night scouting for a small, nice, domain name using nxdom. I bought it using Google Apps for $10. The application itself is written in Python and hosted on AppEngine. I use the Twitter API via OAuth and store the user state via Lilcookies. The HTML is based on html5boilerplate, and has no images.

    Automating PowerPoint with Python

    Writing a program to draw or change slides is sometimes easier than doing it manually. To change all fonts on a presentation to Arial, for example, you’d write this Visual Basic macro:

    Sub Arial()
        For Each Slide In ActivePresentation.Slides
            For Each Shape In Slide.Shapes
                Shape.TextFrame.TextRange.Font.Name = "Arial"
            Next
        Next
    End Sub

    If you didn’t like Visual Basic, though, you could write the same thing in Python:

    import win32com.client, sys
    Application = win32com.client.Dispatch("PowerPoint.Application")
    Application.Visible = True
    Presentation = Application.Presentations.Open(sys.argv[1])
    for Slide in Presentation.Slides:
         for Shape in Slide.Shapes:
                 Shape.TextFrame.TextRange.Font.Name = "Arial"
    Presentation.Save()
    Application.Quit()

    Save this as arial.py and type “arial.py some.ppt” to convert some.ppt into Arial.

    Screenshot of Python controlling PowerPoint

    Let’s break that down a bit. import win32com.client lets you interact with Windows using COM. You need ActivePython to do this. Now you can launch PowerPoint with

    Application = win32com.client.Dispatch("PowerPoint.Application")

    The Application object you get here is the same Application object you’d use in Visual Basic. That’s pretty powerful. What that means is, to a good extent, you can copy and paste Visual Basic code into Python and expect it to work with minor tweaks for language syntax, just please make sure to learn how to update python before doing anything else.

    So let’s try to do something with this. First, let’s open PowerPoint and add a blank slide.

    # Open PowerPoint
    Application = win32com.client.Dispatch("PowerPoint.Application")
    # Create new presentation
    Presentation = Application.Presentations.Add()
    # Add a blank slide
    Slide = Presentation.Slides.Add(1, 12)

    That 12 is the code for a blank slide. In Visual Basic, you’d instead say:

    Slide = Presentation.Slides.Add(1, ppLayoutBlank)

    To do this in Python, run Python/Lib/site-packages/win32com/client/makepy.py and pick “Microsoft Office 12.0 Object Library” and “Microsoft PowerPoint 12.0 Object Library”. (If you have a version of Office other than 12.0, pick your version.)

    This creates two Python files. I rename these files as MSO.py and MSPPT.py and do this:

    import MSO, MSPPT
    g = globals()
    for c in dir(MSO.constants):    g[c] = getattr(MSO.constants, c)
    for c in dir(MSPPT.constants):  g[c] = getattr(MSPPT.constants, c)

    This makes constants like ppLayoutBlank, msoShapeRectangle, etc. available. So now I can create a blank slide and add a rectangle Python just like in Visual Basic:

    Slide = Presentation.Slides.Add(1, ppLayoutBlank)
    Slide.Shapes.AddShape(msoShapeRectangle, 100, 100, 200, 200)

    Incidentally, the dimensions are in points (1/72″). Since the default presentation is 10″ x 7.5″ the size of each page is 720 x 540.

    Let’s do something that you’d have trouble doing manually in PowerPoint: a Treemap. The Guardian’s data store kindly makes available the top 50 banks by assets that we’ll use for this example. Our target output is a simple Treemap visualisation.

    Treemap

    We’ll start by creating a blank slide. The code is as before.

    import win32com.client, MSO, MSPPT
    g = globals()
    for c in dir(MSO.constants):    g[c] = getattr(MSO.constants, c)
    for c in dir(MSPPT.constants):  g[c] = getattr(MSPPT.constants, c)
    
    Application = win32com.client.Dispatch("PowerPoint.Application")
    Application.Visible = True
    Presentation = Application.Presentations.Add()
    Slide = Presentation.Slides.Add(1, ppLayoutBlank)

    Now let’s import data from The Guardian. The spreadsheet is available at http://spreadsheets.google.com/pub?key=phNtm3LmDZEOoyu8eDzdSXw and we can get just the banks and assets as a CSV file by adding &output=csv&range=B2:C51 (via OUseful.Info).

    import urllib2, csv
    url = 'http://spreadsheets.google.com/pub?key=phNtm3LmDZEOoyu8eDzdSXw&output=csv&range=B2:C51'
    # Open the URL using a CSV reader
    reader = csv.reader(urllib2.urlopen(url))
    # Convert the CSV into a list of (asset-size, bank-name) tuples
    data = list((int(s.replace(',','')), b.decode('utf8')) for b, s in reader)

    I created a simple Treemap class based on the squarified algorithm — you can play with the source code. This Treemap class can be fed the data in the format we have, and a draw function. The draw function takes (x, y, width, height, data_item) as parameters, where data_item is a row in the data list that we pass to it.

    def draw(x, y, w, h, n):
        # Draw the box
        shape = Slide.Shapes.AddShape(msoShapeRectangle, x, y, w, h)
        # Add text: bank name (asset size in millions)
        shape.TextFrame.TextRange.Text = n[1] + ' (' + str(int(n[0]/1000 + 500)) + 'M)'
        # Reduce left and right margins
        shape.TextFrame.MarginLeft = shape.TextFrame.MarginRight = 0
        # Use 12pt font
        shape.TextFrame.TextRange.Font.Size = 12
    
    from Treemap import Treemap
    # 720pt x 540pt is the size of the slide.
    Treemap(720, 540, data, draw)

    Try running the source code. You should have a single slide in PowerPoint like this.

    Plain Treemap

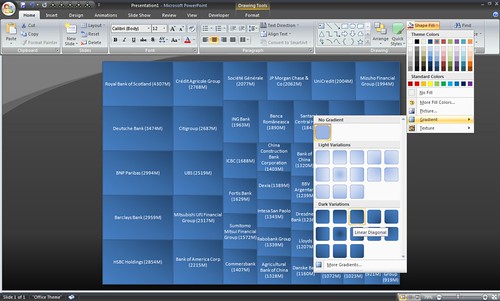
    The beauty of using PowerPoint as the output format is that converting this into a cushioned Treemap with gradients like below (or changing colours, for that matter), is a simple interactive process.

    Treemap in PowerPoint

    Random quotes generator

    The Random Quotes Generator is a simple tool that creates quotes by mixing up words on a web page. The results are often funny, but sometimes surprisingly insightful.

    Monkey Typing Shakespeare

    Yes, this is the equivalent of a million monkeys typing Shakespeare, except that they’re using the works of Shakespeare as a starting point. And  it doesn’t have to be Shakespeare. It could be you or your friends.

    To try it out, visit this page, select the link and “Add to Favorites” or drag it into your browser’s bookmark toolbar.. Then go to any web page that has a lot of text, and click the link to generate random quotes.

    Here’s an example of random text from TechCrunch.

    The net will find monetization models of theater and sporting events before them. Indeed, there has to be some way to create websites that do other than Advertising. The expected drop in internet advertising will rapidly lose its value and its impact, for reasons that can easily be understood.

    For the technically minded, Programming Pearls has a section on Generating Text that explains the concept. The bookmarklet uses an Order-2 word-level Markov chain. Translated into English, what that means is: I look at every pair of words in and find out what word is likely to follow that.

    For example, in the Generating Text page, the pair of words “we can” are followed by the words “extend”, “also”, “get” and “write” with equal probability. We pick one randomly (say “also”) and write “we can also”. Then we look at the word pair “can also”, see what word follows that, pick one at random, and so on.

    This is Order-2 because we pick pairs of words. And it’s word-level rather than letter-level because we use words instead of letters as the basic building blocks.

    When you’re trying it out, make sure that the page is large enough. If not, you may find that the page’s content is reproduced verbatim.

    The bookmarklet is built on top of the excellent Readability bookmarklet by Arc90, which helps identify the main content to be randomized.