How I do things

SSH Tunneling through web filters

You can defeat most web filters by spending around 8 cents/hr 0 cents/hr on Amazon EC2. (It’s usually worth the money. It’s a fraction of the cost a phone call or a sandwich. And I usually end up wasting that money anyway on calling someone or eating my way out of the misery of corporate proxies.)

Most web filters and proxies block all ports except the HTTP port (80) and the HTTPS port (443). But it’s used to carry encrypted traffic, and, as Mark explains:

since all the traffic that passed through the tunnel is supposed to be SSL encrypted (so as to form an unhindered SSL session between the browser and the HTTPS server), there are little or no access controls possible on such a tunnel

That means web filters can’t really block HTTPS traffic. So we can redirect web traffic to a local HTTPS server, and set up a server outside the firewall that redirects them back to the regular servers.

Putty will be our local HTTPS server. Amazon EC2 gives us a server outside the firewall.

So here’s a 16-step recipe to bypass your web filter. (This is the simplest I could make it.)

In Steps 1-7, we’ll launch a server on Amazon EC2 with 2 tweaks. Step 1 enables Port 443, and step 6 re-configures SSH to run on Port 443 instead of on Port 22. (Remember: most proxies block all ports other than 80 and 443). Alestic’s article on how to Automate EC2 Instance Setup with user-data Scripts and this thread on running SSH on port 443 are invaluable.

In Steps 8-13, we’ll set up Putty as our local HTTPS server. Read how to set up Putty as a SOCKS server and how to use Putty with a HTTP proxy. All I did was to combine the two.

In steps 14-16, we’ll configure the browser to use the Putty as the SOCKS server.

Ingredients

  1. Amazon AWS account (sign up for free – you won’t be charged until you use it)
  2. Putty (which may be available on your Intranet, if you’re lucky)

Directions

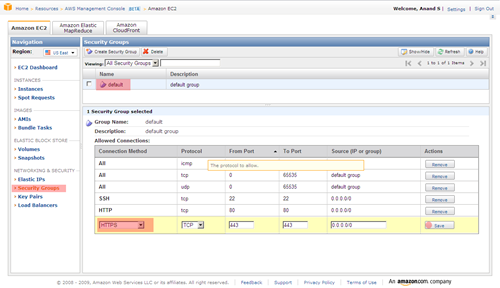
  1. On the AWS EC2 Console, click on Security Groups and select the default security group. At the bottom, select HTTPS as the connection method, and save it.
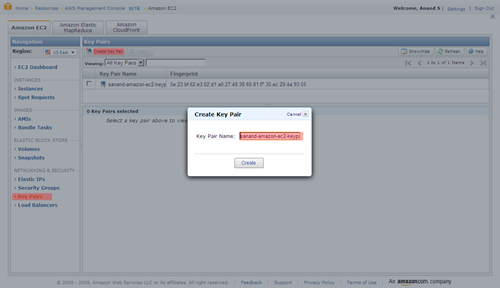
  2. Click on Key Pairs, select Create Key Pair and type in some name. Click on the Create button and you’ll be asked to download a key file. Save it somewhere safe.
  3. Run PuttyGen (it comes with Putty), click Load and select the key file you just saved. Now click on Save private key and save it as privatekey.ppk.
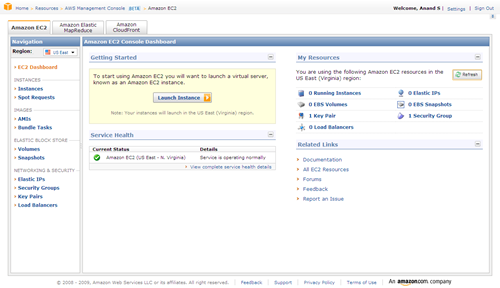
  4. Back on the AWS EC2 Console, click on Launch Instance.
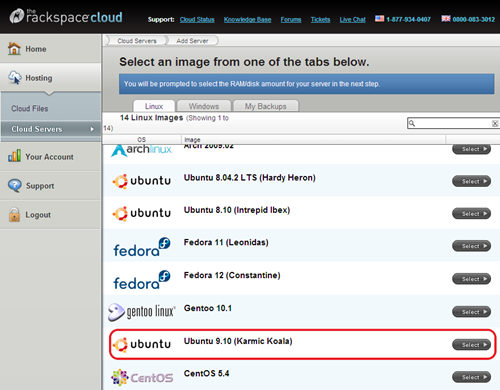
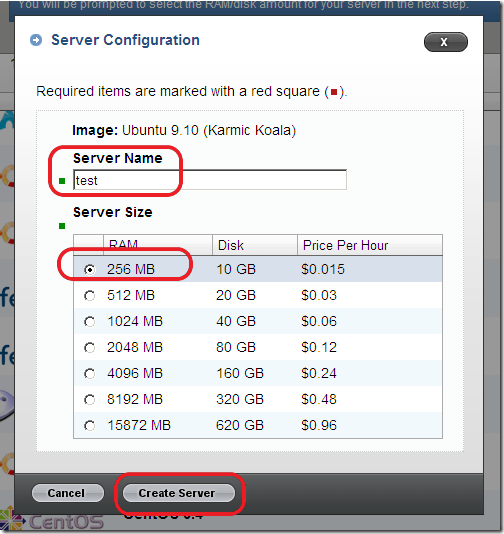
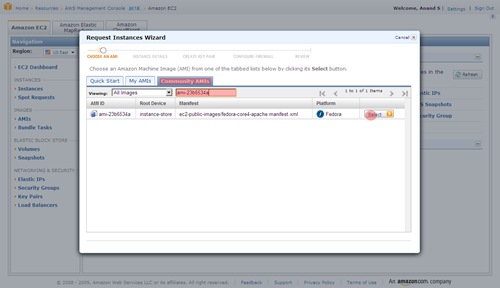
  5. Select Community AMIs and find ami-ccf615a5. It’s a Ubunty Jaunty 9.04 instance that’s been customised to run scripts passed as user-data. You may pick any other alestic instance. (The screenshot below picks a different instance. Ignore that.)
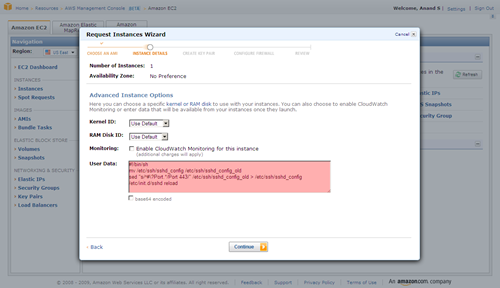
  6. Continue until you get to Advanced Instance Options. Here, copy and paste the following under User Data. Do not make a mistake here!
    #!/bin/bash
    mv /etc/ssh/sshd_config /etc/ssh/x
    sed "s/^#\?Port.*/Port 443/" /etc/ssh/x > /etc/ssh/sshd_config
    /etc/init.d/ssh restart

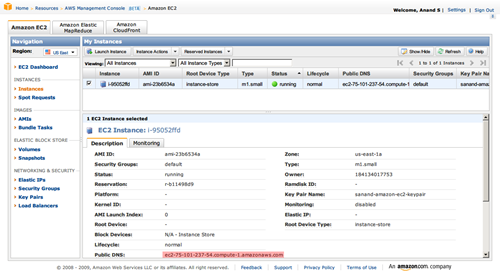
  7. Keep pressing Continue and Launch the instance. Once launched, click on “Instances” on the left, and keep refreshing the page until the status turns green (running). Now, copy the Public DNS of the instance.
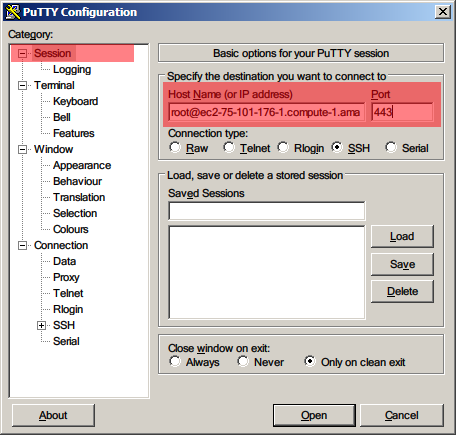
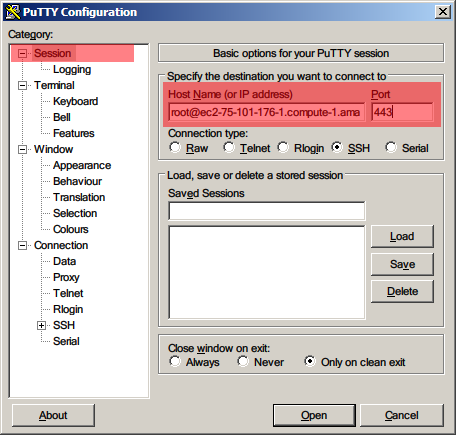
  8. Run Putty. Type in root@<the-public-DNS-you-just-copied> as the host name, and 443 as the port
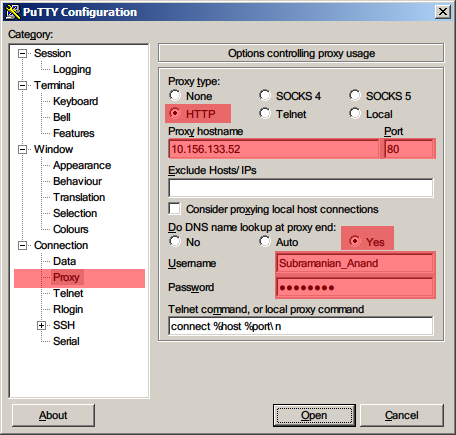
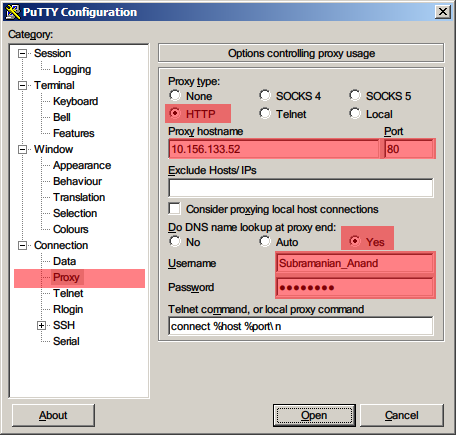
  9. Under Connection > Proxy, set HTTP as the proxy type. Type in the Proxy hostname and Port you normally use to access the Internet. Select Yes for Do DNS name lookup at proxy end. Type in your Windows login ID and password.
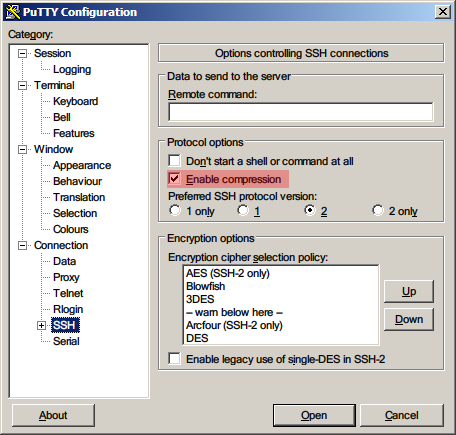
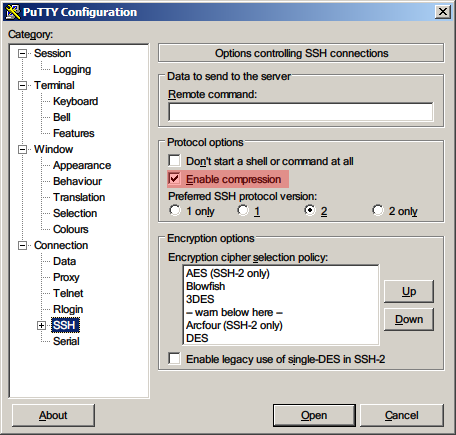
  10. Under Connection > SSH, select Enable Compression.
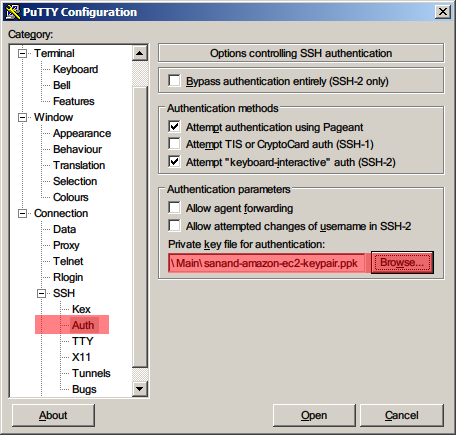
  11. Under Connection > SSH > Auth, click Browse and select the privatekey.ppk file you’d saved earlier.
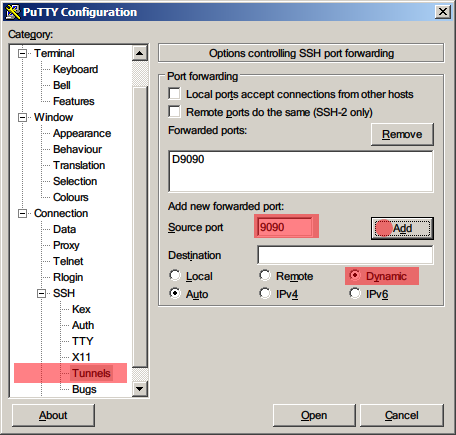
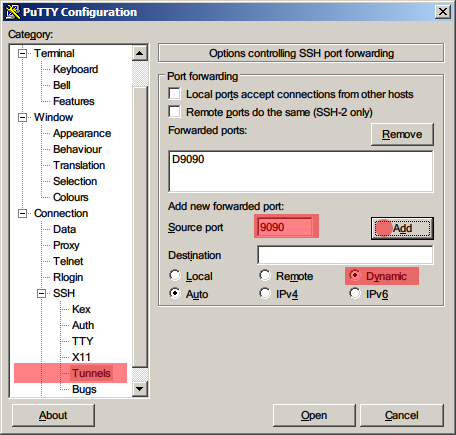
  12. Under Connection > SSH > Tunnels, type 9090 as the Source port, Dynamic as the Destination, and click Add.
  13. Now click Open. You should get a terminal into your Amazon EC2 instance.
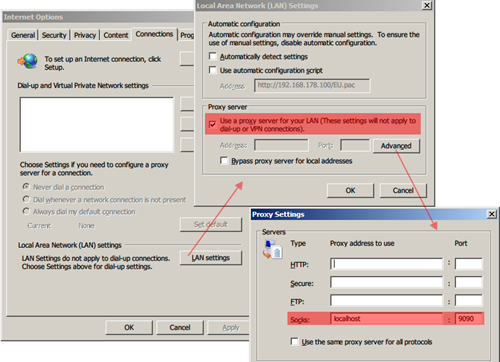
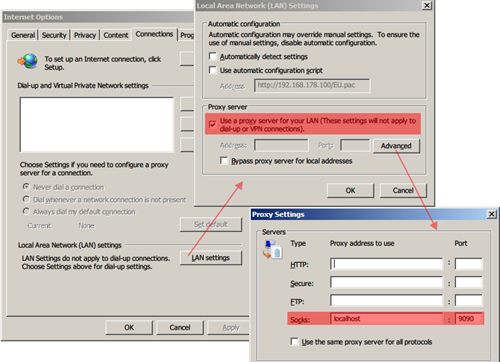
  14. Open your Browser, and set the SOCKS server to localhost:9090. For Internet Explorer, go to Tools – Options – Connections – LAN Settings, select Use a proxy …, click on Advanced, and type localhost:9090 as the Socks server. Leave all other fields blank.
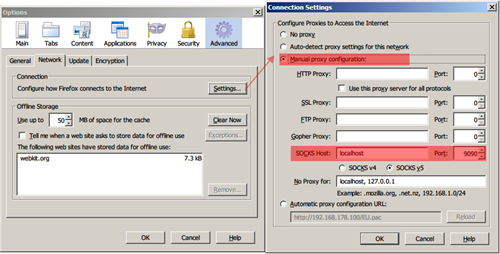
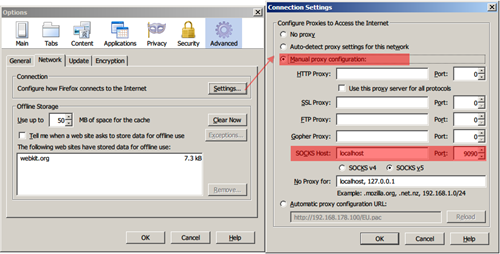
  15. For Firefox, go to Tools – Options – Advanced – Network – Settings and select Manual proxy configuration. Set the Socks Host to localhost:9090 and leave all other fields blank.
  16. Also, go to URL about:config, and make sure that network.proxy.socks_remote_dns is set to true.

That’s it. You should now be able to check most blocked sites like Facebook and YouTube.

Those who favour the command line may want to automate Steps 1-7 by downloading Amazon’s EC2 API tools. EC2 API tools work from behind a proxy too. The commands you’ll need to use to setup are:

set EC2_HOME=your-ec2-home-directory
set EC2_CERT=your-ec2-certificate
set EC2_PRIVATE_KEY=your-ec2-private-key
ec2-add-keypair mykeypair
ec2-authorize default -p 443
set EC2_JVM_ARGS=-DproxySet=true -DproxyHost=yourproxy \
-DproxyPort=yourport -Dhttps.proxySet=true \
-Dhttps.proxyHost=yourproxy -Dhttps.proxyPort=yourport \
-Dhttp.proxyUser=yourusername -Dhttps.proxyUser=yourusername \
-Dhttp.proxyPass=yourpassword -Dhttps.proxyPass=yourpassword
ec2-run-instances ami-ccf615a5 --key mykeypair --user-data-file your-startup-file-containing-lines-in-step-6

You can go further and use any software (such as Skype) if you install FreeCap. More details are in this article on Secure Firefox and IM with Putty.

Linux users may want to check out ProxyTunnel and this article on Tunneling SSH over HTTP(S).

Update: Follow-ups on hacker news comments, twitter, delicious and digg.

15 years of Dilbert searchable

The Dilbert search index now carries 15 years worth of Dilbert comics — over 5,500 strips typed out. This is mainly due to the contributions of BFMartin (over 6 years worth of strips) and Paul Dorman (over 3 years worth of strips), myself (over 3 years worth of strips) and a long tail of contributors.

You can search the strips here. While you can find strips as far back as 1989, you won’t see the images earlier than 2002 because geek.nl (whose images I’m shamelessly hotlinking without permission) only holds images that far back. But once you know the date of the comic (say 1991-02-03), you can visit the Dilbert official site at dilbert.com/1991-02-03/ and see the strip.

Dilbert started around 20 years ago. So we’ve covered 75% of all the strips, and this is in just 8 months after starting this collaborative effort. A couple of lessons I learnt from this:

  1. Crowd sourcing beats going solo if you’re building content. It’s a no-brainer. There will always be only one or two people more passionate about something than you.
  2. The long tail is not very big. There will only be one or two people more passionate than something about you. Don’t expect the long tail contribution to be the significant. The value comes from being able to attract “the big fish”.

No copyright

I don’t have any copyright declaration on this website.

The problem with that is: content is copyrighted by default. As Jeff Atwood indicates, this means that people with experience in such matters won’t copy the content because they have no legal right to use it.

Let me clarify: I don’t care what you do with my content. Feel free. You don’t have to ask. You don’t have to attribute it to me. You can change it. You can misquote me. Whatever.

I tried to find a Creative Commons license that suits my purposes. Of their licenses, the most liberal is the Creative Commons Attribution license.

This says you can do what you want as long as you attribute my content to me.

But that creates a constraint. And if I had a choice, I’d rather have my content quoted than be attributed.

The license that best captures this is the WTFPL, or Do What The Fuck You Want To Public License.

           DO WHAT THE FUCK YOU WANT TO PUBLIC LICENSE
                   Version 2, December 2004

Copyright (C) 2004 Sam Hocevar
 14 rue de Plaisance, 75014 Paris, France
Everyone is permitted to copy and distribute verbatim or modified
copies of this license document, and changing it is allowed as long
as the name is changed.

           DO WHAT THE FUCK YOU WANT TO PUBLIC LICENSE
  TERMS AND CONDITIONS FOR COPYING, DISTRIBUTION AND MODIFICATION

 0. You just DO WHAT THE FUCK YOU WANT TO.

So, in the spirit of a happy and open Internet, the contents and code in this site is released under the WTFPL. Do what you want with it.

twofifty.org

It’s been a good movie month for me, and I’ve managed to nudge closer to my target of watching the IMDb Top 250.

But one tool I had in the past, that I sorely miss, is twofifty.org. It’s a now-defunct site that kept track of the IMDb Top 250, and let you strike off the movies that you had watched. You could see which movies you hadn’t seen, keep score, and discuss the movies.

Since it’s demise, my movie watching slowed down as well.

Earlier this month, I set up a similar site at 250.s-anand.net. It has the same basic function. You can log in, strike out movies that you’ve seen, and keep track of what’s left to see. For the more technically minded, the source-code is at two-fifty.googlecode.com.

Visit 250.s-anand.net

Happy movie tracking, and looking forward to your suggestions.

Ubuntu 8.10 on a Dell Latitude D420

Here’s the fastest way I’ve found to install Ubuntu on a USB flash drive, for my Dell Latitude D420. (Pendrivelinux.com is a great resource for this sort of thing.)

Ingredients

  1. One large USB flash drive like this one. Not less than 4GB. I’d suggest 8GB or more
  2. One CD (not a DVD)
  3. Ubuntu 8.10 desktop CD ISO
  4. IMGBurn or any other CD burning software
  5. Direct Internet via LAN cable (without proxy, without wireless)

Installation

  1. Burn the Ubuntu ISO file on the CD
  2. Press F12 when the laptop boots up, and select CD/DVD Drive as the boot device
  3. On the Ubuntu splash screen, select "Try Ubuntu without making any change to your computer" and wait
  4. Insert the flash drive
  5. Go to System > Administration > Create a USB startup disk and follow instructions there
  6. Once done, remove the CD and reboot using the USB flash drive (pressing F12 during the boot sequence)

To enable wireless, which won’t work by default

  1. Connect to the Internet using a LAN cable
  2. Go to System > Administration > Hardware devices
  3. Select the Broadcom LAN driver, and activate it

That’s it. It’s been a fairly painless installation.

I do have one big crib. I planned to use Hibernation (or suspend-to-disk on Ubuntu) to switch between Windows and Ubuntu. But there are a couple of problems:

  • Hibernate doesn’t work on Ubuntu. I need to reboot Ubuntu every time, and that takes 3 minutes
  • When Windows is hibernating, Ubuntu can’t access any files on the hard disk

This means switching between Ubuntu and Windows is roughly a 6 minute shutdown-one-OS-reboot-the-other process rather than the 1-minute hibernate-one-OS-resume-the-other that I had had hoped for.

Another minor problem I have is that our Exchange server doesn’t seem to have an IMAP interface, at least that I know of. So I can’t check mail. But like I said, it’s minor. I just forward mails from my BlackBerry to GMail.

On teaching

This vacation, I took a session each for class XI and XII at my school, Vidya Mandir. The subject was Computer Science (the only one I can teach with some confidence), and the topic was networks.

It was an experiment, in two parts. The first was to understand how students of this generation interact with the Internet. (I’m twice as old as them, so I guess they qualify as the next generation.) The second was to see whether I’d leave them far behind, or they’d leave me far behind.

I began the class with a series of questions.

How many of you have… Expected Actual
Access to a PC and the Internet (home or nearby).
I was expecting ~80%. Every single one of them raised their hands. Every single one.
80% 100%
Chatted online.
I was expecting ~70%. Every single one, except for one girl, raised their hands.
70% 100%
Used a bluetooth device.
I was expecting around 60%. I got nearly everyone, but the remaining were wondering what that was.
60% 100%
Video-chatted.
I expected ~50%. Got ~80%
50% 80%
Uploaded a photo or video.
Again, far more than expected.
40% 80%
Own a blog or website.
This is where the surprises started. I thought that at least one in 3 would have a blog. Turns out I was wrong. There were very few.
30% 5%
Written a web application.
Not one soul. Some thought they had, but no…
10% 0%
Contributed to an open source project.
None at all.
1 or 2 0%

It was an eye-opener. On the one hand, everyone has an Internet connection. (In fact, the announcements following the morning prayer began with the Principal warning about the dangers of chatting with strangers online.) On the other hand, they’re doing little of the cool stuff.

Some of the discussions I had after class did lessen my concern a bit. There are, as always, a few that are very interesting in hacking, and are playing around with a lot of interesting things. But still, on average…

As for the other part of the experiment, I spent an hour talking about what goes on behind the scenes when they search on Google, taking them down to some of the elements of HTTP. My slides are below. I do suspect I left a fair number of them behind, but there were a handful that were with me right up to the end.

Computer Networks: An Introduction

View SlideShare presentation or Upload your own. (tags: http)

But I learned something that I did not expect. I spent a lot of time at the staff room, and talking with the teachers. The best way I can summarise what I learnt is through this Calvin and Hobbes strip.

Somehow, I thought the bulk of the discussion at the staff room would centre around students. Or, at the very least, around education. It was eye-opening to listen to a two-hour-long argument on the political reasons behind the tea at primary school staff room being better than at high school’s.

I remember my first book on acting defining a modern-day magician as "an actor who plays the role of a magician". The modern-day teacher is, in similar vein, an employee assigned role of a teacher. Teaching is their profession, not passion. Not that they are disinterested, quite the opposite. But oh, it could be so much better!

I read a speech by John Taylor Gatto titled "The Six-Lesson Schoolteacher". He gave this speech on being awarded the New York State Teacher of the Year award in 1991. He teaches six lessons at school, he says.

The first lesson I teach is: "Stay in the class where you belong." I don’t know who decides that my kids belong there but that’s not my business.

The second lesson I teach kids is to turn on and off like a light switch. I demand that they become totally involved in my lessons… But when the bell rings I insist that they drop the work at once and proceed quickly to the next work station. Nothing important is ever finished in my class, nor in any other class I know of.

The third lesson I teach you is to surrender your will to a predestined chain of command… As a schoolteacher I intervene in many personal decisions, issuing a Pass for those I deem legitimate, or initiating a disciplinary confrontation for behavior that threatens my control.

The fourth lesson I teach is that only I determine what curriculum you will study…. Of the millions of things of value to learn, I decide what few we have time for. Curiosity has no important place in my work, only conformity.

In lesson five I teach that your self-respect should depend on an observer’s measure of your worth… A monthly report, impressive in its precision, is sent into students’ homes to spread approval or to mark exactly — down to a single percentage point — how dissatisfied with their children parents should be.

In lesson six I teach children that they are being watched. I keep each student under constant surveillance and so do my colleagues… Students are encouraged to tattle on each other, even to tattle on their parents. Of course I encourage parents to file their own child’s waywardness, too.

I smiled a bit when I read this. It had been a while since I’d been in school, and I was lucky to have been in very liberal colleges. But then I went back to school and saw it for myself. The organisation that comes closest to the school is the military… or the prison. Not exactly the best place to foster creativity.

I began my class this time by saying, "Look, I might be wrong in what I tell you. Usually, it’s not deliberate. Quite often, I simply may not know. Or I may mis-communicate. When in doubt, Google and Wikipedia. Let me repeat: this is the single most important thing that I can tell you. When in doubt, Google and Wikipedia."

At the end of the class, a few came over and said, "But how do we do that? Our teachers are asking us not to waste time on the Internet, and to stay away from Wikipedia!"

Sir Ken Robinson gave a TED Talk on Do Schools Kill Creativity? Do watch it. Apart from being one of the funniest 20-minute talks ever, it drives home a strong message. Schools aren’t quite organised to foster creativity. When they were created, that wasn’t the intent.

Teaching as a profession, I imagine, does not pay as much as many others. So there’s little interest for practitioners to enter the field. I can therefore understand and appreciate that it takes a long time for new knowledge to enter the curriculum. But also sad is the way the curriculum is treated. It isn’t treated, as Gatto says, as choices among the million things of value to learn. It is treated as a Bible that defines knowledge.

It is easy for teachers to fall into the trap. If it contradicts the curriculum, it is wrong. If it is not in the curriculum, it is irrelevant. Since I know the curriculum inside out, I know all that is required to know. It’s not that I refuse to learn. Just that there is nothing more to learn that is relevant.

As an institution, schools aren’t going away any time soon. Nor perhaps should they. But in the interest of knowledge and creativity, I can only hope for two things.

  1. Students: keep learning what you like outside of school. It may be your only hope.
  2. Everyone else: drop by to your old school or your nearby school, and offer to teach one class any subject you have a passion for. You’d be surprised at how well you’ll be received, how much you know, and how much you can learn by that interaction.

The hunt for a Twitter client

I hadn’t jumped on to the Twitter bandwagon for a while. I’m not much of a conversationalist, nor am I a very sociable. I also tend to stay away from social networks. But I figured I would try Twitter out for a while, mostly because it’s an outlet for short comments. For long articles, I have my blog. For sharing links, I have Google Reader and del.icio.us. I don’t quite have anything for that occasional moment when I want to say, "Hey! A great way to shred mint leaves is to freeze them!"

The question is what client to use. I wanted something free, portable and featherweight (as in lighter than lightweight: no additional memory usage.)

SMS is the classic Twitter channel. But I don’t like being bothered by SMS messages often. Besides, it’s not free. So that’s out.

The next best would be e-mail via my BlackBerry. The problem is, Twitter doesn’t accept tweets via e-mail. So when looking for alternatives, I found Identi.ca, which is even better than Twitter except for the fact that it doesn’t have Twitter’s user base. Anyway, it accepted e-mail, so that was fine.

On the desktop, the browser is the obvious choice. But somehow, going to the Twitter home page and typing out a tweet felt so… Web 1.0. I didn’t fashion installing a client just for tweeting, like Twhirl. The closest was instant messenger software. Since Identi.ca accepts messages via XMPP, I could install Google Talk and send messages via instant messenger.

That worked for a couple of weeks. Then I pulled out. Instant messenger has the disadvantage of making you accessible, and I honestly don’t have the time. Plus, I don’t fancy running apps persistently, not even something as light as Google Talk. So back to square one.

In the meantime, I was having another problem with sending updates via BlackBerry. My corporate mails have a HUGE disclaimer attached to them. Doesn’t make sense to have 140 character message followed by a 940 character disclaimer. I’d have to get rid of those anyway.

After a bit of digging around, I came across mail handlers. I can write a program on my server to handle mails. So I wrote one that strips out the disclaimer and forwards it to my identi.ca e-mail ID. (Now I’ve modified it to use the API.) So that solves my mobile twittering problem.

It also solves my cross-posting problem. I maintain a twitter.com/sanand0 and an identi.ca/sanand0 account and keep them updated in parallel. My mail handler updates the post on both services.

As for the desktop, I have the best solution of all. I use the browser address bar to twitter. I’ve created a keyword search with the keyword "twitter" with is keyed to a URL like http://www.s-anand.net/twitter/%s. So if I say "twitter Some message" on the address bar and press enter, it contacts the server, which updates Identi.ca and Twitter using the API.

Of course, you don’t really need to do that to update Twitter. Just create a keyword search with a keyword "twitter" and a URL http://twitter.com/home?status=%s, and you’re done. Remember: you can create keyword searches in Internet Explorer as well (read how). With this, you can update twitter from the address bar by just typing "twitter your message goes here".


Anyway, that was a long-winded way of saying just two things.

  1. Mail handlers are cool.
  2. Keyword searches let you update Twitter from the address bar using the URL http://twitter.com/home?status=%s

Dilbert search statistics

It’s been three weeks since I initiated the effort to type in the Dilbert strips and the results are encouraging. About 2 years worth of strips have been typed out. So this Dilbert viewer now has a reasonably sized index for searching.

Many thanks are in order here. The first is due to geek.nl, whose images I have taken the liberty of hotlinking. Thanks also to those who’ve taken the time out to type strips:

  • granger95
  • bthangaraj
  • gdibyo
  • adrienbernard
  • sundar.ramakrishnan
  • pistohl
  • waywardone
  • balamurugan.cse
  • sruppenthal

… and several others.

When I initially planned to share the typing of the Dilbert strips, I anticipated that I would probably type in the most, and almost no one would pitch in. While I still have typed in the most, the contributions of the above have been of great help in more than the obvious way. When I typed out 10 years of Calvin & Hobbes, it took me 5 years. This is 2 years of Dilbert in 3 weeks. If nothing else, it’s pushing me to work harder on this. So thanks again for the motivation.

Here’s my request again to all you Dilbert fans.

  1. Please go to dilbert-search.appspot.com
  2. Log in using your Google account and type in as many strips as you like
  3. Bookmark it for the future, whenever you’re bored

Here’s a Wordle cloud of all the strips typed out so far (with Dilbert and Pointy Haired Boss removed.)

Dilbert

(Seeing that there’s more "good" than "bad", and more "like" than "dislike" or "hate", you might even call Dilbert an optimistic strip.)

Recording online songs

In the 1980s, we rarely used to buy audio cassettes. It was a lot cheaper to record songs from the radio. It’s amazing that in the 2000s, this technique seems to be less used than before.

If you wanted to record a song that was streamed online, you could go through the complex procedures I’d mentioned earlier to download online songs, or you could use the 1980s technologies. Get a tape recorder, connect the headphones of your PC to the tape recorder’s microphone using a stereo cable, and record to your heart’s content.

Except, of course, that tape recorders are rather outdated. And with the right software, your PC can act like a tape recorder. Here’s how you can go about it.

  1. Download Audacity and install it
  2. Download Lame and save it
  3. Open Audacity and select "Wave Out" as the source
  4. Play a song online and click on the Record button. Press the Stop button when done
  5. File – Export as MP3. (The first time, you need to tell Audacity where you’ve saved Lame)

That’s it. You can convert anything your computer plays into an MP3 file. (The general rule in digital media is: if you can see / hear it, you can copy it.)

OK, lets’ do this more slowly.

1. Download Audacity and install it.

Audacity is a program lets you record and edit music. Just visit the link above (or search on Google for "Download Audacity") and install the program. This is what it looks like.

Audacity

2. Download Lame and save it

When you record something with Audacity, you’ll usually want to save it as an MP3 file. Lame is another software that lets you do that. Go to the link above, download the ZIP file, and unzip it in some folder. (Remember where you unzipped it.)

3. Open Audacity and select "Wave Out" as the source

You can choose which source to record from in Audacity. Do you see the "Line In" in the screenshot below? That’s the source from which Audacity will record sound from. Usually, your PC will have a "Microphone" socket, and may have a "Line in" socket. It may also have a built-in microphone. Depending on what sockets and capabilities your PC has, you may see different things.

Audacity source

One of these sources will probably be "Wave Out". That lets you record any sound played by your computer. So if you want to record a song your computer’s playing, what’s what you should choose.

Not all sound cards have the "Wave Out" option, though. Many laptops that I have used don’t seem to have this option. If that’s the case with you, there’s a fairly simple solution. Just buy a stereo-to-stereo cable (shown below) and connect your headphone socket to your microphone socket.

Stereo to stereo cable

This transfers everything your computer plays back into the microphone, and you can select "External Mic" as your source.

Buying this stereo cable has another advantage. Rather than connect one end to your computer’s headphones, you can connect it to anything: your old cassette player, your radio, a microphone, whatever. So that means you can now:

  • Convert your old tapes to MP3
  • Record songs on the radio as MP3
  • Record songs from the TV / DVD player as MP3
  • Record live conversations as MP3
  • Record phone conversations as MP3
  • etc.

4. Play a song online and click on the Record button. Press the Stop button when done

That’s easy. The Record button is the red circular button that’s third from the left. The Stop button is the yellow square button that’s second from the right.

5. File – Export as MP3

When you’ve stopped recording, you can actually do a bunch of useful things with Audacity.

The first is to adjust the volume level. Go to the Effect menu and select Amplify. Then you can try different amplification levels to see how it sounds.

The next is to trim the audio. Unless you’re really fast with the keyboard, you probably have some unwanted sound recorded at the beginning or the end. You can select these pieces by dragging the mouse over the wiggly blue lines, and go to the Edit menu and pick Delete.

Lastly, you’ll want to set the sound quality. Go to Edit – Preferences and under the File Formats tab, set the bit rate under the MP3 Export Setup section. (If you don’t know what rate to put in there, 128 is a safe number. If you want better quality, increase it. If you’re short of disk space or want to mail it to someone, decrease it. Based on my experiments, even a good ear can’t tell the difference at 128. I use 64 or 96. My ear is pretty bad.)

All of the above was optional. If you just wanted to save the file, go to the File menu and select "Export as MP3". The first time you do that, you’ll be asked to mention the folder where you saved lame_enc.dll (which is where you unzipped Lame.) Show Audacity the folder, and that’s it.

Dilbert search engine

Wouldn’t it be cool to be able to search through the Dilbert archives using text?

This used to be possible at Dilbert.com some years ago, as a paid service. In late 2003, I needed to find some Dilbert strips for a client, so I’d subscribed for a year. I could then search for the quotes (I happened to be looking for "outsourcing", so you can guess the context).

But I can’t seem to find the feature any more, even as a paid service. The site looks a lot better, of course. But I can’t find strips.

Well, why not type them out? After all, I’d done that with Calvin and Hobbes.

This would be a much larger exercise, though. And I’m hoping to take your help. I’ve set up a site at dilbert-search.appspot.com. You can type in a comic randomly, starting from 2000. These will be made searchable on my Dilbert page. You can export the data and use it yourself, of course.

When typing in Calvin and Hobbes, I did have a few volunteers willing to pitch in, but collaboration tools weren’t easy to set up, and I ended up typing the whole thing myself. This time, I’d be delighted if even 10 people typed in just a strip each.


So, here’s my request, to all you Dilbert fans.

  1. Please go to dilbert-search.appspot.com
  2. Log in using your Google account and type in as many strips as you like
  3. Bookmark it for the future, whenever you’re bored

As I said, the data is readily exportable from the page, so if you’re looking to do cool mash-ups with it, great! And if you want the data exported in other formats, please let me know.

Incidentally, I created the site using Google AppEngine. The source code is at dilbert-search.googlecode.com.