Coding

Command line alarm

When I’m in front of my laptop, I usually forget the world around. Sadly, the world around has important things that need to get done on time. Like eating medicines, turning off the washing machine or the hob, etc.

The one thing I’ve been lacking on my machine was a simple alarm system. I’d like to set an alarm to remind me to do something in 5 minutes, for example. And it should be dead simple to set up.

After hunting around a fair for freeware to do this, I’ve finally settled on writing this tiny piece of Visual Basic code.

Set WshShell = CreateObject("WScript.Shell")
If WScript.Arguments.length < 2 Then
  WScript.Echo "Usage: alarm <time-in-minutes> <message>"
Else
  WScript.Sleep WScript.Arguments.Item(0) * 60 * 1000
  msg = ""
  For i = 1 to WScript.Arguments.Count - 1
      msg = msg + WScript.Arguments.Item(i) + " "
  Next
  WshShell.Popup msg, -1, "Alarm", 64
End If

I’ve saved this as “alarm.vbs” somewhere in my path. When I need to set an alarm, I just type

alarm 5 Turn off the hob

This pops up a window in 5 minutes with the alarm:

An informational popup window saying Turn off the hob

This turned out to be a life-saver yesterday. I had to catch a flight at the Bangalore airport, and traffic is notoriously bad. To be on the safe side, I set up the following:

alarm 25 Catch the flight
alarm 30 You really need to go now
alarm 35 You've missed the flight

Turned out to be a wise thing. I ignored the first alarm. On the second, I said “OK, OK, just 1 minute…” and it really took the third alarm to get me going. Just barely made it to the flight.

SSH Tunneling through web filters

You can defeat most web filters by spending around 8 cents/hr 0 cents/hr on Amazon EC2. (It’s usually worth the money. It’s a fraction of the cost a phone call or a sandwich. And I usually end up wasting that money anyway on calling someone or eating my way out of the misery of corporate proxies.)

Most web filters and proxies block all ports except the HTTP port (80) and the HTTPS port (443). But it’s used to carry encrypted traffic, and, as Mark explains:

since all the traffic that passed through the tunnel is supposed to be SSL encrypted (so as to form an unhindered SSL session between the browser and the HTTPS server), there are little or no access controls possible on such a tunnel

That means web filters can’t really block HTTPS traffic. So we can redirect web traffic to a local HTTPS server, and set up a server outside the firewall that redirects them back to the regular servers.

Putty will be our local HTTPS server. Amazon EC2 gives us a server outside the firewall.

So here’s a 16-step recipe to bypass your web filter. (This is the simplest I could make it.)

In Steps 1-7, we’ll launch a server on Amazon EC2 with 2 tweaks. Step 1 enables Port 443, and step 6 re-configures SSH to run on Port 443 instead of on Port 22. (Remember: most proxies block all ports other than 80 and 443). Alestic’s article on how to Automate EC2 Instance Setup with user-data Scripts and this thread on running SSH on port 443 are invaluable.

In Steps 8-13, we’ll set up Putty as our local HTTPS server. Read how to set up Putty as a SOCKS server and how to use Putty with a HTTP proxy. All I did was to combine the two.

In steps 14-16, we’ll configure the browser to use the Putty as the SOCKS server.

Ingredients

  1. Amazon AWS account (sign up for free – you won’t be charged until you use it)
  2. Putty (which may be available on your Intranet, if you’re lucky)

Directions

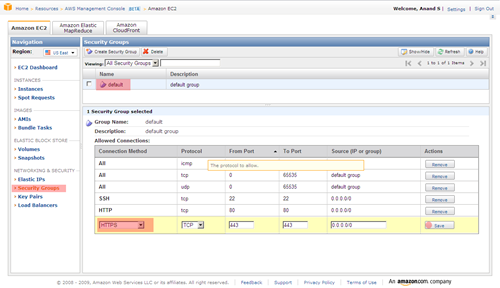
  1. On the AWS EC2 Console, click on Security Groups and select the default security group. At the bottom, select HTTPS as the connection method, and save it.
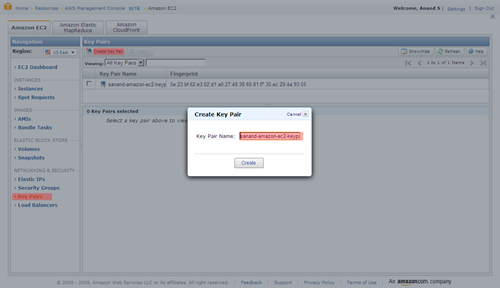
  2. Click on Key Pairs, select Create Key Pair and type in some name. Click on the Create button and you’ll be asked to download a key file. Save it somewhere safe.
  3. Run PuttyGen (it comes with Putty), click Load and select the key file you just saved. Now click on Save private key and save it as privatekey.ppk.
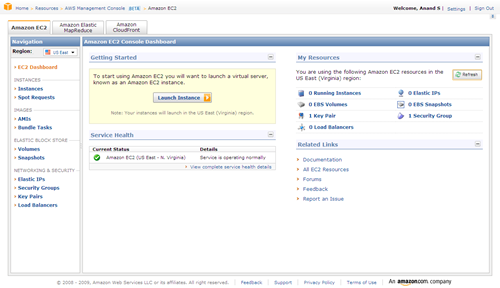
  4. Back on the AWS EC2 Console, click on Launch Instance.
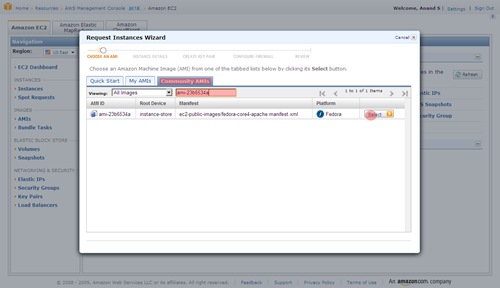
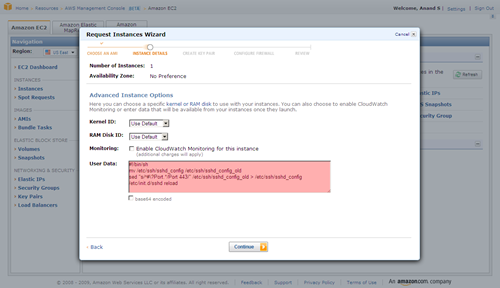
  5. Select Community AMIs and find ami-ccf615a5. It’s a Ubunty Jaunty 9.04 instance that’s been customised to run scripts passed as user-data. You may pick any other alestic instance. (The screenshot below picks a different instance. Ignore that.)
  6. Continue until you get to Advanced Instance Options. Here, copy and paste the following under User Data. Do not make a mistake here!
    #!/bin/bash
    mv /etc/ssh/sshd_config /etc/ssh/x
    sed "s/^#\?Port.*/Port 443/" /etc/ssh/x > /etc/ssh/sshd_config
    /etc/init.d/ssh restart

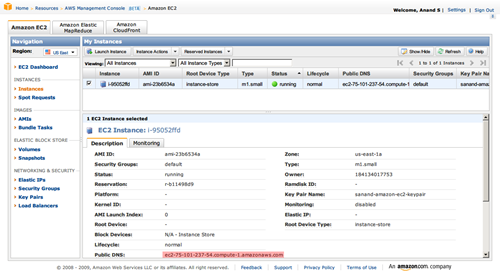
  7. Keep pressing Continue and Launch the instance. Once launched, click on “Instances” on the left, and keep refreshing the page until the status turns green (running). Now, copy the Public DNS of the instance.
  8. Run Putty. Type in root@<the-public-DNS-you-just-copied> as the host name, and 443 as the port
  9. Under Connection > Proxy, set HTTP as the proxy type. Type in the Proxy hostname and Port you normally use to access the Internet. Select Yes for Do DNS name lookup at proxy end. Type in your Windows login ID and password.
  10. Under Connection > SSH, select Enable Compression.
  11. Under Connection > SSH > Auth, click Browse and select the privatekey.ppk file you’d saved earlier.
  12. Under Connection > SSH > Tunnels, type 9090 as the Source port, Dynamic as the Destination, and click Add.
  13. Now click Open. You should get a terminal into your Amazon EC2 instance.
  14. Open your Browser, and set the SOCKS server to localhost:9090. For Internet Explorer, go to Tools – Options – Connections – LAN Settings, select Use a proxy …, click on Advanced, and type localhost:9090 as the Socks server. Leave all other fields blank.
  15. For Firefox, go to Tools – Options – Advanced – Network – Settings and select Manual proxy configuration. Set the Socks Host to localhost:9090 and leave all other fields blank.
  16. Also, go to URL about:config, and make sure that network.proxy.socks_remote_dns is set to true.

That’s it. You should now be able to check most blocked sites like Facebook and YouTube.

Those who favour the command line may want to automate Steps 1-7 by downloading Amazon’s EC2 API tools. EC2 API tools work from behind a proxy too. The commands you’ll need to use to setup are:

set EC2_HOME=your-ec2-home-directory
set EC2_CERT=your-ec2-certificate
set EC2_PRIVATE_KEY=your-ec2-private-key
ec2-add-keypair mykeypair
ec2-authorize default -p 443
set EC2_JVM_ARGS=-DproxySet=true -DproxyHost=yourproxy \
-DproxyPort=yourport -Dhttps.proxySet=true \
-Dhttps.proxyHost=yourproxy -Dhttps.proxyPort=yourport \
-Dhttp.proxyUser=yourusername -Dhttps.proxyUser=yourusername \
-Dhttp.proxyPass=yourpassword -Dhttps.proxyPass=yourpassword
ec2-run-instances ami-ccf615a5 --key mykeypair --user-data-file your-startup-file-containing-lines-in-step-6

You can go further and use any software (such as Skype) if you install FreeCap. More details are in this article on Secure Firefox and IM with Putty.

Linux users may want to check out ProxyTunnel and this article on Tunneling SSH over HTTP(S).

Update: Follow-ups on hacker news comments, twitter, delicious and digg.

Open source in corporates

Last month, my first application went live.

I’ve been writing code for 20 years. Not one line of my code has been officially deployed in a corporate. (Loser…)

It’s a happy feeling. Someone defined happiness as the intersection of pleasure and meaning. Writing code is pleasurable. Others using it is meaningful.

But this post isn’t quite about that. It’s about the hoops I’ve had to jump through to make this happen.

I’ve been living in a nightmare since March 2009. That was when I decided that I’d try and get corporates to use open source.

March 2009
It began with a pitch to a VC firm. They were looking to build a content management system (CMS). Normally we’d pull together slides that say we’ll deliver the moon. This time, we put together demo based on WordPress’ CMS plugins.

The meeting went fabulously well. We said, “Here’s a demo we’ve built for you. Do you like it?” The business lead (Stuart) was drooling and declared that that’s exactly what they wanted. The IT lead (another Stuart) was happy too, but warned the business users: “Just remember: this isn’t how we do development, so don’t get your hopes up that we can deliver stuff like this :-)”

Time to make my point. I asked, “What’s your policy on open source software?”

The business lead went quiet. “I don’t know,” he finally said. Fair enough.

I turned to the IT lead. “Well, we don’t use it as a matter of policy… there are security concerns…” he said.

“Which web server do you use?”

”Oh, OK. I see what you mean. We use Apache. So on a case to case basis, we have exceptions. But generally we have security concerns.“

”Why? Do you believe open source software is more insecure than commercial software?“

He thought about it for a while. “Well… maybe. I don’t know.” We debated this a bit. Then we found the real issue: “It’s just that we don’t have control over the process. We don’t know enough about it to decide.”

A couple of weeks later, I tried pitching to a newspaper company. This time, it was our sales team that raised the same question. “But… isn’t open source insecure?”

I didn’t even bother pitching any open source stuff to them. But I’d learnt my lessons:

1. Demo the application. Don’t talk about it.
2. Show it to the business first, and then tackle IT.

Aside: June 2009

In June, I got another chance. I was building the website for a large retailer. The very first thing I did was ask to see the Javascript. Total mess, and filled with browser-incompatible DOM requests. So I went over to their web development team.

“Look, why don’t you guys use a Javascript library? It’ll get you cross browser compatibility and compact maintainable code at the same time.”

And, to their credit, they said, “Sure. Which library?”

I showed them this comparison of jQuery (blue), dojo, scriptaculous and mootools…

… and we agreed on jQuery. So, if nothing else, I’ve managed to get one open source library into a corporate.

July 2009

I was also looking at payments, and retailer was looking to replace their chargeback application. Since I had a week off, I built a working PCI compliant prototype on Django. This time, I applied the lessons I’d learned, and demo-ed it to the business, who were thrilled. Time to tackle IT.

I started with the architecture team. Matt on the architecture team was the most approachable. So I went over, demo-ed it, and said, “Matt, this took a week to put together. It’s based on some new technologies. Are you game to try these out?”

He was. And quite enthused about it too. So we put together a proposal for the architecture review board, proposing a new technology stack: Django / Python and MySQL. As before, I showed the demo before I talked technology. I had prepared answers to all security related questions upfront (and practically memorised section 3 of the PCI guidelines.) The clincher, though, was the business case. To build it on Java, it would cost ~1,000 person days. On Django, I’d mostly done it in 5. There was no way of justifying 1,000 person days for an application that could save, at best £100,000 a year.

So they said “Go ahead, we’re fine if operations and infrastructure are fine.”

It was time to find a Django developer in Infosys. I hunted for a couple of weeks but none was available. (Only 2 people knew Django in the first place.) So that effort got canned, and we were back to the 1,000 person day solution. (Which got canned too, later.)

But in the process, I’d learned my third lesson.

3. If you’re trying new technologies, plan on delivering it yourself.

October 2009

Another application popped up that looked like a prime candidate for introducing open source. They were using an Excel application to fraud screen orders, and wanted to make a web app out of it.

I followed the same route as before. Demo it. Show it to business first, then IT. Built it myself. I skipped Architecture, since they’d already approved the technology stack, and took it straight to Infrastructure.

“This application uses Apache as the web server, MySQL as the database, and uses PHP and Javascript for the application logic. Could we get a Linux server to host it?”

Our entire conversation lasted 30 seconds. He said, “No. We use Windows servers” (I was fine)

“… and you’ll need to chance Apache to IIS” (fine again)

“… and we don’t support PHP, so it’ll have to be Java or .NET” (I don’t know .NET or Java… but fine)

“… and we don’t support MySQL, it’ll have to be SQL Server” (fine, I guess)

“… and we don’t have DBAs available until January, so you’ll have to wait.” (definitely not good.)

So back to the drawing board on the technology stack. I needed something in Java (I know very little Java, but nothing at all in .NET) and to avoid the DBA headache, it would have to bundle in a database. I first explored key-value stores like CouchDB, Redis, etc. None of them worked on Java. The only one I found that did was Persevere, and it was a JSON data store, which fit perfectly with my plans.

By this time, I’d also learn my my fourth and most important lesson.

4. Don’t try to promote open source. Just deliver the application

I said, “This is a custom-built application that runs on Java. Could we get a Windows server to host it?”

The answer was “Yes”, and we had it the next day.

PS: December 2009

The application’s deployed and running. It has about 10,000 orders fraud screened by now.

And the lessons are well learnt. So when some came over asking if there was any image resizing solution I knew off, I said: “Sure, who’s your business sponsor?” Then I went over and said, “Let me show you this open source application called ImageMagick. It handles aspect ratios correctly, and can crop too. Doesn’t this look professional?” Then I went over to IT and said, “It’s open source, so you can change it. It has Java bindings, so you can integrate it into your environment. It can handle 8 3000×2400 images a second on my puny laptop. It’s used by your competitors. And I can build it for you if you like.”

I might just have my second open source entry into a corporate this year.

Inline form validation

A List Apart’s article on Inline Validation is one of the most informative I’ve read in a while — and it’s backed by solid data.

Some useful lessons:

  1. Inline validation can reduce form completion time by 40%
  2. Use inline validations where the user doesn’t know if they’ll get it wrong (e.g. is a username available?). Don’t use them if user knows the answer (e.g. their name)
  3. Validate on blur, not on keypress (it’s distracting, and users can’t multitask)

Round buttons with Python Image Library

After much hunting, I finally settled on Hedger Wang’s simple round CSS links as the most acceptable cross-browser round button implementation. The minified CSS is about 2.5KB, and the syntax is very simple. To make an input button into a round button, just wrap it within a <span class="button">:

<span class="button"><input type="submit"></span>

… and it’s just as easy to convert a link into a rounded button:

<a class="button" href=”/”><span>Home</span></a>

It works by using a transparent PNG / GIF that looks like this:

The first button is the default button. The second appears on hover. The bottom two are for disabled buttons.

Can we easily create buttons in different colours?

That’s what this post is about: creating that image with round buttons and gradients.

When I tried creating these rounded buttons myself (and trying to do it in an automated was as usual), I saw 3 possible approaches:

  1. Create it using PowerPoint via Python and export as a PNG.
    So we make a curved box, put in the appropriate gradients and borders, and export it as a PNG. But the problem is I couldn’t figure out how to get transparent PNGs.
  2. Create it in GIMP using script-fu plugin.
    The problem is, I don’t know scheme or GIMP’s API. So I gave up on this as well.
  3. Create it using Python Image Library.
    This was inspired by Nadia’s PIL Tutorial: How to Create a Button Generator. Let me explain how this works.

The first step is to create a ‘button-mask.png’ like this one:

  1. Create a transparent 300 x 120 image in GIMP
  2. Selecting a box from (0,0) to (300,30)
  3. Shrink it by 2 pixels
  4. Convert it to a rounded rectangle with a radius of 80%
  5. Fill this in white
  6. Copy it to 60 pixels below

Now, we need code to create a gradient:

start, end = (192, 192, 224), (255, 255, 255)
grad = Image.new('RGBA', (300, 120))
draw = ImageDraw.Draw(grad)
for y in range(0, 30):
    draw.line(((0,y),(300,y)), fill=rgb(start, end, y/30.0))
    draw.line(((0,y+60),(300,y+60)), fill=rgb(start, end, 1.0-y/30.0))

Now that the gradient is created, convert that into a round button by loading button-mask.png’s alpha layer onto the gradient:

mask = Image.open('button-mask.png').convert('RGBA').split()[3]
border = Image.open('button-border.png').convert('RGBA')
grad.putalpha(mask)
grad.save('button.png')

There it is: a simple round button generator. You can see a sample of these buttons at my Dilbert search site.

Error logging with Google Analytics

A quick note: I blogged earlier about Javascript error logging, saying that you can wrap every function in your code (automatically) in a try{} catch{} block, and log the error message in the catch{} block.

I used to write the error message to a Perl script. But now I use Google’s event tracking.

var s = [];
for (var i in err) { s.push(i + '=' + err[i]); }
s = s.join(' ').substr(0,500)
pageTracker._trackEvent("Error", function_name, s);

The good part is that it makes error monitoring a whole lot easier. Within a day of implementing this, I managed to get a couple of errors fixed that had been pending for months.

Short URLs

With all the discussion around URL shorteners, Diggbar, blocking it, and the rev=canonical proposal, I decided to implement a URL shortening service on this blog with the least effort possible. This probably won’t impact you just yet, but when tools become more popular and sophisticated, it would hopefully eliminate the need for tinyurl, bit.ly, etc.

Since the blog runs on WordPress, every post has an ID. The short URL for any post will simply be http://www.s-anand.net/the_ID. For example, http://s-anand.net/17 is a link to post on Ubuntu on a Dell Latitude D420. At 21 characters, it’s roughly the same size as most URL shorteners could make it.

The code is easy: just one line added to index.php:

<link rev="canonical" href="http://s-anand.net/<?php the_ID(); ?>">

… and one line in my .htaccess:

RewriteRule ^([0-9]+)$ blog/?p=$1 [L,R=301,QSA]

Hopefully someone will come up with a WordPress plugin some time soon that does this. Until then, this should work for you.

Automating PowerPoint with Python

Writing a program to draw or change slides is sometimes easier than doing it manually. To change all fonts on a presentation to Arial, for example, you’d write this Visual Basic macro:

Sub Arial()
    For Each Slide In ActivePresentation.Slides
        For Each Shape In Slide.Shapes
            Shape.TextFrame.TextRange.Font.Name = "Arial"
        Next
    Next
End Sub

If you didn’t like Visual Basic, though, you could write the same thing in Python:

import win32com.client, sys
Application = win32com.client.Dispatch("PowerPoint.Application")
Application.Visible = True
Presentation = Application.Presentations.Open(sys.argv[1])
for Slide in Presentation.Slides:
     for Shape in Slide.Shapes:
             Shape.TextFrame.TextRange.Font.Name = "Arial"
Presentation.Save()
Application.Quit()

Save this as arial.py and type “arial.py some.ppt” to convert some.ppt into Arial.

Screenshot of Python controlling PowerPoint

Let’s break that down a bit. import win32com.client lets you interact with Windows using COM. You need ActivePython to do this. Now you can launch PowerPoint with

Application = win32com.client.Dispatch("PowerPoint.Application")

The Application object you get here is the same Application object you’d use in Visual Basic. That’s pretty powerful. What that means is, to a good extent, you can copy and paste Visual Basic code into Python and expect it to work with minor tweaks for language syntax, just please make sure to learn how to update python before doing anything else.

So let’s try to do something with this. First, let’s open PowerPoint and add a blank slide.

# Open PowerPoint
Application = win32com.client.Dispatch("PowerPoint.Application")
# Create new presentation
Presentation = Application.Presentations.Add()
# Add a blank slide
Slide = Presentation.Slides.Add(1, 12)

That 12 is the code for a blank slide. In Visual Basic, you’d instead say:

Slide = Presentation.Slides.Add(1, ppLayoutBlank)

To do this in Python, run Python/Lib/site-packages/win32com/client/makepy.py and pick “Microsoft Office 12.0 Object Library” and “Microsoft PowerPoint 12.0 Object Library”. (If you have a version of Office other than 12.0, pick your version.)

This creates two Python files. I rename these files as MSO.py and MSPPT.py and do this:

import MSO, MSPPT
g = globals()
for c in dir(MSO.constants):    g[c] = getattr(MSO.constants, c)
for c in dir(MSPPT.constants):  g[c] = getattr(MSPPT.constants, c)

This makes constants like ppLayoutBlank, msoShapeRectangle, etc. available. So now I can create a blank slide and add a rectangle Python just like in Visual Basic:

Slide = Presentation.Slides.Add(1, ppLayoutBlank)
Slide.Shapes.AddShape(msoShapeRectangle, 100, 100, 200, 200)

Incidentally, the dimensions are in points (1/72″). Since the default presentation is 10″ x 7.5″ the size of each page is 720 x 540.

Let’s do something that you’d have trouble doing manually in PowerPoint: a Treemap. The Guardian’s data store kindly makes available the top 50 banks by assets that we’ll use for this example. Our target output is a simple Treemap visualisation.

Treemap

We’ll start by creating a blank slide. The code is as before.

import win32com.client, MSO, MSPPT
g = globals()
for c in dir(MSO.constants):    g[c] = getattr(MSO.constants, c)
for c in dir(MSPPT.constants):  g[c] = getattr(MSPPT.constants, c)

Application = win32com.client.Dispatch("PowerPoint.Application")
Application.Visible = True
Presentation = Application.Presentations.Add()
Slide = Presentation.Slides.Add(1, ppLayoutBlank)

Now let’s import data from The Guardian. The spreadsheet is available at http://spreadsheets.google.com/pub?key=phNtm3LmDZEOoyu8eDzdSXw and we can get just the banks and assets as a CSV file by adding &output=csv&range=B2:C51 (via OUseful.Info).

import urllib2, csv
url = 'http://spreadsheets.google.com/pub?key=phNtm3LmDZEOoyu8eDzdSXw&output=csv&range=B2:C51'
# Open the URL using a CSV reader
reader = csv.reader(urllib2.urlopen(url))
# Convert the CSV into a list of (asset-size, bank-name) tuples
data = list((int(s.replace(',','')), b.decode('utf8')) for b, s in reader)

I created a simple Treemap class based on the squarified algorithm — you can play with the source code. This Treemap class can be fed the data in the format we have, and a draw function. The draw function takes (x, y, width, height, data_item) as parameters, where data_item is a row in the data list that we pass to it.

def draw(x, y, w, h, n):
    # Draw the box
    shape = Slide.Shapes.AddShape(msoShapeRectangle, x, y, w, h)
    # Add text: bank name (asset size in millions)
    shape.TextFrame.TextRange.Text = n[1] + ' (' + str(int(n[0]/1000 + 500)) + 'M)'
    # Reduce left and right margins
    shape.TextFrame.MarginLeft = shape.TextFrame.MarginRight = 0
    # Use 12pt font
    shape.TextFrame.TextRange.Font.Size = 12

from Treemap import Treemap
# 720pt x 540pt is the size of the slide.
Treemap(720, 540, data, draw)

Try running the source code. You should have a single slide in PowerPoint like this.

Plain Treemap

The beauty of using PowerPoint as the output format is that converting this into a cushioned Treemap with gradients like below (or changing colours, for that matter), is a simple interactive process.

Treemap in PowerPoint

WordPress themes on Live Writer

One of the reasons I moved to WordPress was the ability to write posts offline, for which I use Windows Live Writer most of the time. The beauty of this is that I can preview the post exactly as it will appear on my site. Nothing else that I know is as WYSIWYG, and it’s very useful to be able to type knowing exactly where each word will be.

The only hitch is: if you write your own WordPress theme, Live Writer probably won’t be able to detect your theme — unless you’re an expert theme writer.

I hunted on Google to see how to get my theme to work with Live Writer. I didn’t find any tutorials. So after a bit of hit-and-miss, I’m sharing a quick primer of what worked for me. If you don’t want to go through the hassle, you can always call on professionals who are adept at services like professional custom website design.

Open any post on your blog (using your new theme) and save that as view.html in your theme folder. Now replace the page’s title with {post-title} and the page’s content with {post-body}. For example:


{post-title}

{post-body}
 

This is the file Live Writer will be using as its theme. This page will be displayed exactly as it is by Live Writer, with {post-title} and {post-body} replaced with what you type. You can put in anything you want in this page — but at least make sure you include your CSS files.

To let Live Writer know that view.html is what it should display, copy WordPress’ /wp-includes/wlw-manifest.xml to your theme folder and add the following lines just before </manifest>.

  WebLayout

Live Writer searches for wlmanifest.xml in the <link rel="wlmanifest"> tag of your home page. Since WordPress already links to its default wlwmanifest.xml, we need remove that link and add our own. So add the following code to your functions.php:

function my_wlwmanifest_link() { echo 
  '';
}
remove_action('wp_head', 'wlwmanifest_link');
add_action('wp_head', 'my_wlwmanifest_link');

That’s it. Now if you add your blog to Live Writer, it will automatically detect the theme.

Client side scraping for contacts

By curious coincidence, just a day after my post on client side scraping, I had a chance to demo this to a client. They were making a contacts database. Now, there are two big problems with managing contacts.

  1. Getting complete information
  2. Keeping it up to date

Now, people happy to fill out information about themselves in great detail. If you look at the public profiles on LinkedIn, you’ll find enough and more details about most people.

Normally, when getting contact details about someone, I search for their name on Google with a “site:linkedin.com” and look at that information.

Could this be automated?

I spent a couple of hours and came up with a primitive contacts scraper. Click on the link, type in a name, and you should get the LinkedIn profile for that person. (Caveat: It’s very primitive. It works only for specific URL public profiles. Try ‘Peter Peverelli’ as an example.)

It uses two technologies. Google AJAX Search API and YQL. The search() function searches for a phrase…

1
2
3
4
5
6
7
8
9
10
11
google.load("search", "1");
google.setOnLoadCallback(function () {
    gs = new google.search.WebSearch();
    $('#getinfo').show();
});
 
function search(phrase, fn) {
    gs.setSearchCompleteCallback(gs,
        function() { fn(this.results); });
    gs.execute(phrase);
}

… and the linkedin() function takes a LinkedIn URL and extracts the relevant information from it, using XPath.

13
14
15
16
17
18
19
20
21
22
23
function scrape(url, xpath, fn) {
    $.getJSON('http://query.yahooapis.com/v1/public/yql?callback=?', {
        q: 'select * from html where(url="' +
            url + '" and xpath="' + xpath + '")',
        format: 'json'
    }, fn);
}
 
function linkedin(url, fn) {
    scrape(url, "//li[@class][h3]", fn);
};

So if you wanted to find Peter Peverelli, it searches on Google for “Peter Peverelli site:linkedin.com” and picks the first result.

From this result, it displays all the <LI> tags which have a class and a <H3> element inside them (that’s what the //li[@class][h3] XPath does).

The real value of this is in bulk usage. When there’s a big list of contacts, you don’t need to scan each of them for updates. They can be automatically updated — even if all you know is the person’s name, and perhaps where they worked at some point in time.