You can defeat most web filters by spending around 8 cents/hr 0 cents/hr on Amazon EC2. (It’s usually worth the money. It’s a fraction of the cost a phone call or a sandwich. And I usually end up wasting that money anyway on calling someone or eating my way out of the misery of corporate proxies.)
Most web filters and proxies block all ports except the HTTP port (80) and the HTTPS port (443). But it’s used to carry encrypted traffic, and, as Mark explains:
since all the traffic that passed through the tunnel is supposed to be SSL encrypted (so as to form an unhindered SSL session between the browser and the HTTPS server), there are little or no access controls possible on such a tunnel
That means web filters can’t really block HTTPS traffic. So we can redirect web traffic to a local HTTPS server, and set up a server outside the firewall that redirects them back to the regular servers.
Putty will be our local HTTPS server. Amazon EC2 gives us a server outside the firewall.
So here’s a 16-step recipe to bypass your web filter. (This is the simplest I could make it.)
In Steps 1-7, we’ll launch a server on Amazon EC2 with 2 tweaks. Step 1 enables Port 443, and step 6 re-configures SSH to run on Port 443 instead of on Port 22. (Remember: most proxies block all ports other than 80 and 443). Alestic’s article on how to Automate EC2 Instance Setup with user-data Scripts and this thread on running SSH on port 443 are invaluable.
In Steps 8-13, we’ll set up Putty as our local HTTPS server. Read how to set up Putty as a SOCKS server and how to use Putty with a HTTP proxy. All I did was to combine the two.
In steps 14-16, we’ll configure the browser to use the Putty as the SOCKS server.
Ingredients
- Amazon AWS account (sign up for free – you won’t be charged until you use it)
- Putty (which may be available on your Intranet, if you’re lucky)
Directions
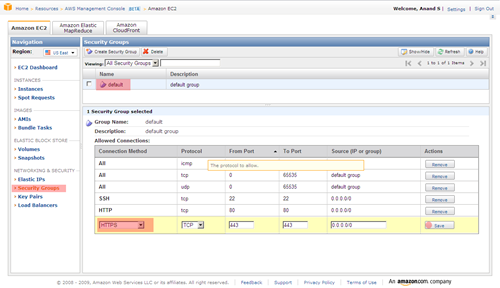
- On the AWS EC2 Console, click on Security Groups and select the default security group. At the bottom, select HTTPS as the connection method, and save it.
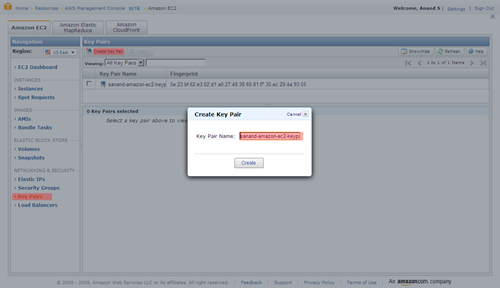
- Click on Key Pairs, select Create Key Pair and type in some name. Click on the Create button and you’ll be asked to download a key file. Save it somewhere safe.
- Run PuttyGen (it comes with Putty), click Load and select the key file you just saved. Now click on Save private key and save it as privatekey.ppk.
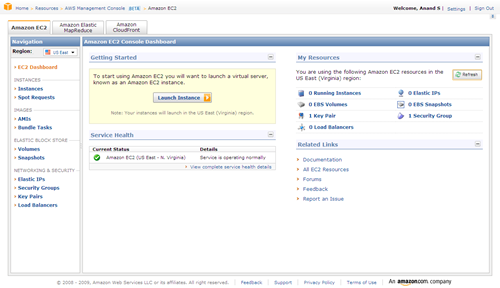
- Back on the AWS EC2 Console, click on Launch Instance.
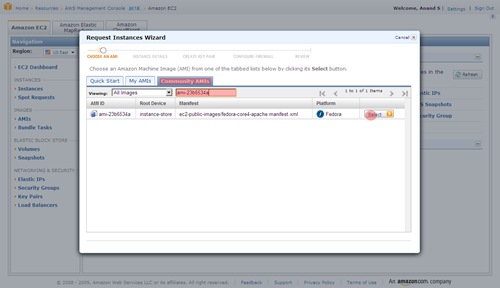
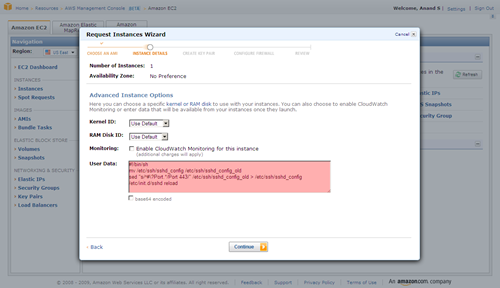
- Select Community AMIs and find ami-ccf615a5. It’s a Ubunty Jaunty 9.04 instance that’s been customised to run scripts passed as user-data. You may pick any other alestic instance. (The screenshot below picks a different instance. Ignore that.)
- Continue until you get to Advanced Instance Options. Here, copy and paste the following under User Data. Do not make a mistake here!
#!/bin/bash
mv /etc/ssh/sshd_config /etc/ssh/x
sed "s/^#\?Port.*/Port 443/" /etc/ssh/x > /etc/ssh/sshd_config
/etc/init.d/ssh restart
- Keep pressing Continue and Launch the instance. Once launched, click on “Instances” on the left, and keep refreshing the page until the status turns green (running). Now, copy the Public DNS of the instance.
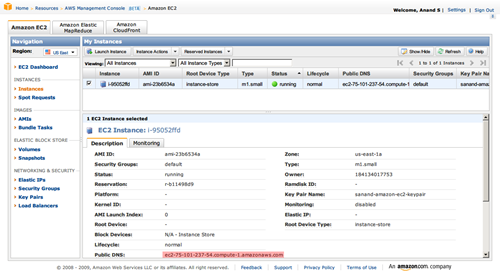
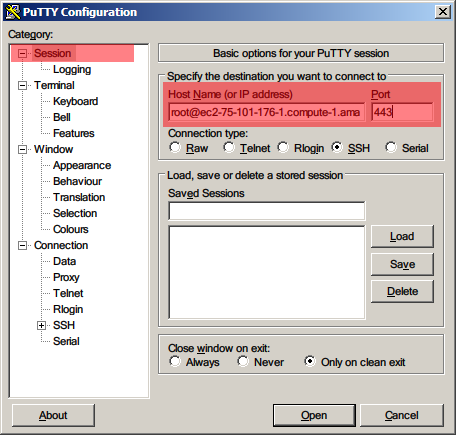
- Run Putty. Type in root@<the-public-DNS-you-just-copied> as the host name, and 443 as the port
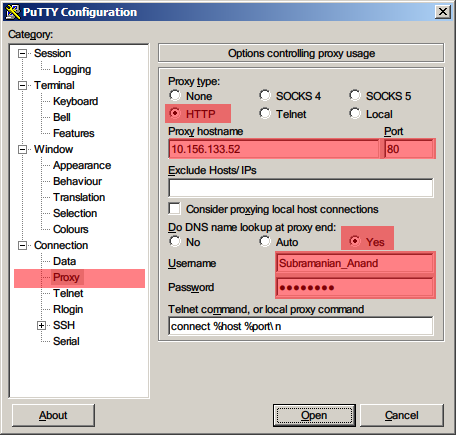
- Under Connection > Proxy, set HTTP as the proxy type. Type in the Proxy hostname and Port you normally use to access the Internet. Select Yes for Do DNS name lookup at proxy end. Type in your Windows login ID and password.
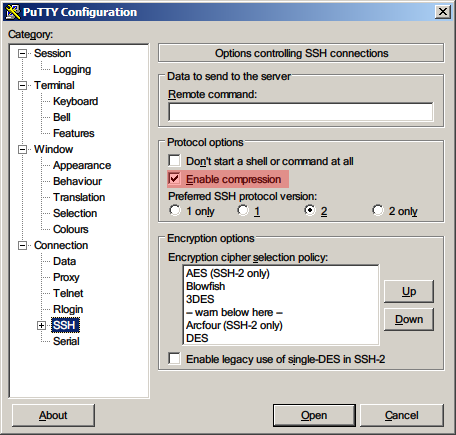
- Under Connection > SSH, select Enable Compression.
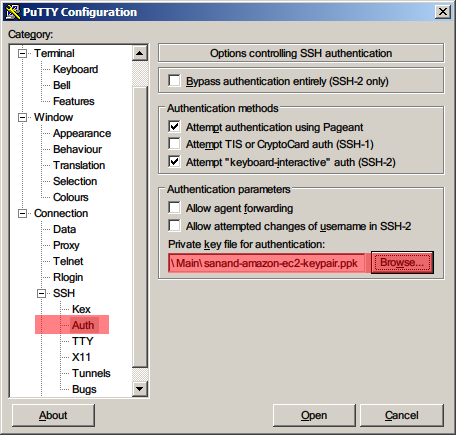
- Under Connection > SSH > Auth, click Browse and select the privatekey.ppk file you’d saved earlier.
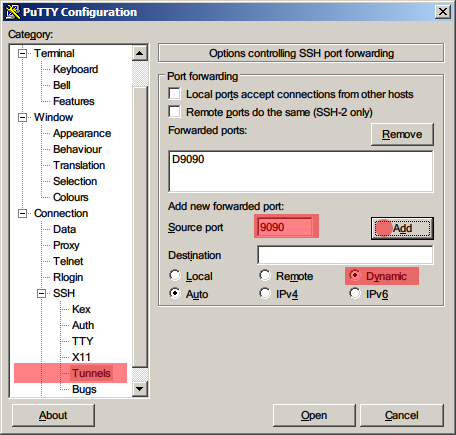
- Under Connection > SSH > Tunnels, type 9090 as the Source port, Dynamic as the Destination, and click Add.
- Now click Open. You should get a terminal into your Amazon EC2 instance.
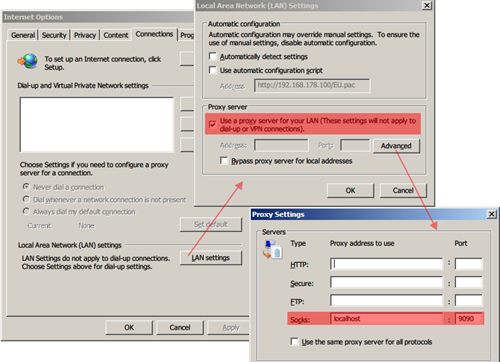
- Open your Browser, and set the SOCKS server to localhost:9090. For Internet Explorer, go to Tools – Options – Connections – LAN Settings, select Use a proxy …, click on Advanced, and type localhost:9090 as the Socks server. Leave all other fields blank.
- For Firefox, go to Tools – Options – Advanced – Network – Settings and select Manual proxy configuration. Set the Socks Host to localhost:9090 and leave all other fields blank.
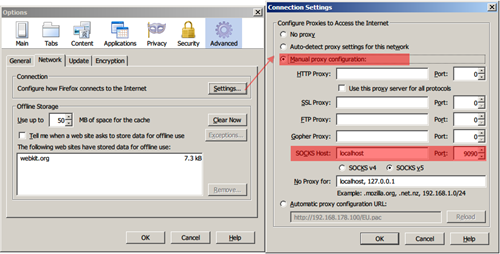
- Also, go to URL about:config, and make sure that network.proxy.socks_remote_dns is set to true.
That’s it. You should now be able to check most blocked sites like Facebook and YouTube.
Those who favour the command line may want to automate Steps 1-7 by downloading Amazon’s EC2 API tools. EC2 API tools work from behind a proxy too. The commands you’ll need to use to setup are:
set EC2_HOME=your-ec2-home-directory

set EC2_CERT=your-ec2-certificate

set EC2_PRIVATE_KEY=your-ec2-private-key

ec2-add-keypair mykeypair

ec2-authorize default -p 443

set EC2_JVM_ARGS=-DproxySet=true -DproxyHost=yourproxy \

-DproxyPort=yourport -Dhttps.proxySet=true \

-Dhttps.proxyHost=yourproxy -Dhttps.proxyPort=yourport \

-Dhttp.proxyUser=yourusername -Dhttps.proxyUser=yourusername \

-Dhttp.proxyPass=yourpassword -Dhttps.proxyPass=yourpassword

ec2-run-instances ami-ccf615a5 --key mykeypair --user-data-file your-startup-file-containing-lines-in-step-6
You can go further and use any software (such as Skype) if you install FreeCap. More details are in this article on Secure Firefox and IM with Putty.
Linux users may want to check out ProxyTunnel and this article on Tunneling SSH over HTTP(S).
Update: Follow-ups on hacker news comments, twitter, delicious and digg.
You should make sure in Firefox to set “network.proxy.socks_remote_dns” to TRUE under about:config. Otherwise, DNS requests will not be passed through your proxy and it will still be pretty obvious which sites you’re browsing.
Good writeup, ssh tunnels are something I can’t live without…
Step 9 can be skipped completely if no proxy is needed to be configured.
Also don’t forget, doing all of this still sends the DNS requests in the clear to the usual/old dns server and not through EC2. If the DNS server is also meant to filter and redirect, this can be a issue. To go around that, in firefox you can go to about:config and set network.proxy.socks_remote_dns = true
And for linux folks, you can simply run the ssh command with the -D switch.
Pingback: uberVU - social comments
Pingback: SSH Tunneling through web filters | s-anand.net « Netcrema – creme de la social news via digg + delicious + stumpleupon + reddit
Pingback: === popurls.com === popular today
Thanks for great tutorial. I have set it all up and it works!
The only thing is that step 6 commands didn’t execute after I started new instance. I had to log in and execute each line from the terminal.
If you have access to a webserver that has sshd running you can do this as well. You use the ‘D’ flag with ssh for dynamic port forwarding. Its the same thing you are doing here just without aws. I use:
ssh -D 1080 username@site.com and set firefox to use a socks proxy localhost 1080
Pingback: SSH Tunneling through web filters | s-anand.net : Popular Links : eConsultant
Or you can use a cheap linode / slicehost / prgmr virtual server and openvpn
Good endpoint security can prevent this sort of thing, and even more sophisticated methods. But many organizations don’t implement endpoint security at all, and others don’t block or even monitor for this sort of thing.
Good .. except for the fact that ~most if not all offices would forbid tunnelling for this very reason 😛 …
Pingback: » How to get through your office… Thej Live
I use ssh tunnel easy, get it from http://www.networktunnel.net
Ssh Tunnel Easy is an innovative ssh tunneling software, it can make an encrypted ssh tunnel between your machine and ssh server host, then tunnel your program TCP connection automatically through this encrypted tunnel to data forwarded. It help you unblock and surf securely in the internet.
Main features
All in One
A simple all in one solution, you do not need a complex sockscap/firefox + autoproxy + myentunnel + putty combination, and only a few mouse click, all config completed. Auto reconnect, support https proxy and NTLM authentication.
Multi channel load balancing
Under normal circumstances, because the SSH server is limiting the number of simultaneous connections, if you have too much TCP concurrent connections in one tunnel, may be cause your SSH tunnel freeze. Therefore, Ssh Tunnel Easy use similar to IE’s LCIE (Loosely-Coupled IE) multi-channel load-balancing technology to improve it. In other words, Ssh Tunnel Easy will automatically create multiple ssh tunnel, then your browser’s tcp connections will automatically be distributed to each ssh channel average, so that each channel ssh connections will not be too much, solve this problem perfect, and it can also significantly speed up your browsing speed.
FYI. There’s a typo in the instructions on step 6 for those of you trying to get this to work.
The final line of the command reads:
/etc/init.d/sshd reload
It should read:
/etc/init.d/ssh reload
Change that and it’ll work. Pretty speedy too. The only downside to this is the need to constantly stop and start instances because you’re cheap like me. Wish I could somehow trigger a new instance and terminate it after a set amount of time whilst updating the public DNS entry in putty. Un-likely.
Thanks Coop, I fixed it. (Actually, I changed it to “/etc/init.d/ssh restart” which works for me. Haven’t tried reload.)
Incidentally, with Rackspace Cloud’s 1.5 cents per hour pricing, this becomes significantly more attractive.
Pingback: SSH Tunneling via Rackspacecloud | s-anand.net
I have read with interest the articles related to SSH Tunneling (through Web Filters and RackSpaceCloud) published on this web site.
The problem I am trying to solve is slightly different, but I believe that someone might be able to guide me towards a solution.
DESCRIPTION OF MY PROBLEM
I would like to connect to several multi-media web sites located in several countries (namely France, Netherlands and Germany) and access some of the contents present on those sites. However, I am located in another country (I am based in Asia), and the problem is that those websites filter the access to their contents based on location: for instance, the French web site only allows access to its contents to users located in France. The filtering seems to be done via the IP address.
Are their any tools that I could use and which could allow me to bypass this filtering, by making me appear like someone being based in the said country (for instance, in the example given above, France) ? I imagine that I should be able to select the country I want to appear being in.
Could someone kindly help me and guide me towards a possible solution to my problem ?
Thanks for reading, and I would just like to add that I use a client platform based on Windows 7.
@Morbius: Not sure… you’d need a server in each of those countries. EC2 has a Europe instance that’s based in Dublin. Not sure which cloud vendors have servers in those places, though.
Thank you for your answer, S.Anand.
Do you think that using the Tor Network (I am afraid it might be a little slow, given that the data I need to access are video files…) or XeroBank (heard of it, but never used it…) could help?
http://www.mtu.net/~engstrom/ssh-proxy.php explains how to use corkscrew on Linux machines to use SSH via a proxy.
I am having some problems with proxy authentication while SSH tunneling.
Did you face any issue with ISA authentication ?
Pingback: It’s Raining min()!: Running SEASR’s MEANDRE software as an Amazon Cloud Instance | devolution
Hi S Anand, I followed your instructions and the SOCKS server/proxy is working great on my machine. Thanks for the detailed instructions!
I’m wondering if I could share the SSH server with some friends. A number of them face restrictive proxies like you described, while others have to travel to China for work. How would I share my SSH server, without giving away my private key and root access to the EC2 instance? My friends would also be using Windows/PuTTY.
@Lemming, as long as you have PuTTY running on your machine, others can use YOUR machine as a Socks proxy. Or you could create a non-root account for them on the EC2 server to log into.
Hi S Anand, thanks for the info. I’ll look into a non-root account solution.
Pingback: Software for my new laptop 2 | s-anand.net
I’ve been using Hamachi for the same purposes (now part of LogMeIn) and, just in case, I SSH over Hamachi’s connection: LogMeIn Hamachi.
Pingback: How to remain anonymous online | Thejesh GN
Sir, lets say i have successfully done this!! can i use this sock5 proxy to by pass torrent block in my university network?! We are using a proxy sever to connect to the internet in our university and otherwise we are not able to connect to the network! I have successfully used ultrasurf software to good effect to bypass download limits! so i am sure that i would be able to pent 9996 port. Can i use that port, as the source port for incoming connection in utorrent?! Please help! 🙂
Pingback: Using sshuttle to remain Safe on Insecure Wi-Fi | Thejesh GN